Showing posts with label Django. Show all posts

Wednesday, December 4, 2019

CURD DJANGO


Project Tree


models.py


views.py


App\static\templates\App

MarcTemplates_list.html


marctemplate_form.html


home.html


urls.py


main\urls.py


View Complete source code on 
https://github.com/rafie-tarabay/BUE/tree/master/project3

Saturday, November 30, 2019

Learn Django Step by Step

Newer Django needs Python version > 3.4
to setup your machine to run django
1) set latest python 3.xx with Pip support
2) Install Pipenv (for more information about pipenv check https://realpython.com/pipenv-guide/)

 pip install pipenv 
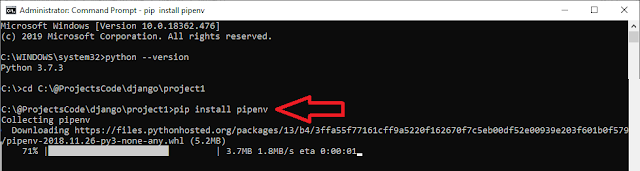


Pipenv basic install command takes the form:
$ pipenv install [package names]
The user can provide these additional parameters:
  • --two — Performs the installation in a virtualenv using the system python2 link.
  • --three — Performs the installation in a virtualenv using the system python3 link.
  • --python — Performs the installation in a virtualenv using the provided Python interpreter.
3) Install latest django framework on current directory only
$ mkdir project1
$ cd project1
$ pipenv --three install Django


4) Activate virtual env
pipenv shell


5) Create new project with name "booktime " on the current folder
django-admin startproject    p1    .  


At this point we should have an initial folder structure (in the current folder) that looks like this:
  • manage.py: The command-line utility that allows you to interact with the Django project. You will use this very frequently throughout the book.
  • p1: A Folder that contains the files every Django project needs, which are
    • ./__init__.py: This is an empty file that is only needed to make the other files importable.
    • ./settings.py: This file contains all the configuration of our project, and can be customized at will.
    • ./urls.py: This file contains all the URL mappings to Python functions. Any URL that needs to be handled by the project must have an entry here.
    • ./wsgi.py: This is the entry point that will be used when deploying our site to production.
  • Pipfile: The list of Python libraries the project is using. At this point it is only Django.
  • Pipfile.lock: The internal Pipenv file.


6) run django project using 
  1. $ ./manage.py runserver
    
7) to configure django default Database tables
       $ ./manage.py migrate

8) django by default creates admin site /admin , and you can set admin password using
       $ ./manage.py createsuperuser

9) Django Projects vs. Apps:
we just create an empty project, but this project will contains many modules each module call App, and to create a new app with name "main" inside the project run command

$ ./manage.py startapp main

this will create a new folder with name main contains these items
main/:
__init__.py  
admin.py  
apps.py  
models.py  
views.py
tests.py
migrations  


Steps Summary
Create project2 with name p2 contains one App module name main

mkdir project2
cd project2
pipenv --three install Django
pipenv shell
django-admin startproject    p2    .  
./manage.py migrate

./manage.py startapp main


Start work with new modules (main in our case)

To start work with new module, you should create ( inside module folder)
1) templates directory : this folder will contains all HTML files
2) templates\main : create 'main' directory inside templates folder (main is the NewApp we just created)
3) static directory: this folder will contains JS and Images and any other static contents 
4) create HTML start page  "\main\templates\home.html"
5) add {% load static %} on the beginning of HTML page and call static resources located in static directory like this {% static 'images/logo.png' %}


6) Update INSTALL_APPS found on settings.py,  Add NewApp we just create with  name "main" to the list

INSTALLED_APPS = [
    'django.contrib.admin',
    'django.contrib.auth',
    'django.contrib.contenttypes',
    'django.contrib.sessions',
    'django.contrib.messages',
    'django.contrib.staticfiles',
    'main.apps.MainConfig', 
]
Notes: if the NewApp name = "draw", the name in INSTALL_APPS will be 'draw.apps.DrawConfig'

7) update views.py file to define start page


8) create  main\urls.py file inside new app directory
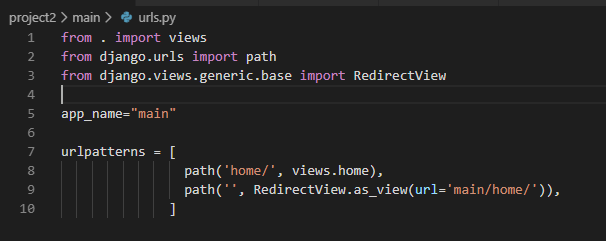


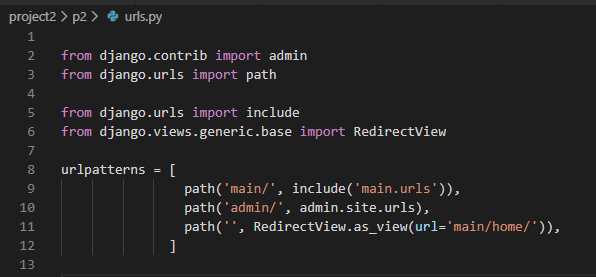
9) update original urls.py to include new app routes file (urls.py)


10) update main\models.py to define Database structure,


11) run  the next commands to create DB tables
./manage.py makemigrations main
./manage.py migrate


How to Handle Static Files in Django using settings.py?

STATIC_ROOT/STATIC_URL handle system static files

during development all static folders inside any App we create will be accessible using static URL, but in run time we will write command ./manage.py collectstatic to copy all static files from all app folders and put them to STATIC_ROOT folder

_ROOT: means where these files are located on HD
_URL: means how you can call these files in the URL

add the next 2 line to settings.py

STATIC_URL = '/static/'
STATIC_ROOT = os.path.join(BASE_DIR, 'static/')


How to Handle Files uploaded at run time using settings.py?

MEDIA_ROOT/MEDIA_URL, handle files uploaded on runtime by users

_ROOT: means where these files are located on HD
_URL: means how you can call these files in the URL


MEDIA_URL = '/FileUpload/'
MEDIA_ROOT = os.path.join(BASE_DIR ,'static', 'FileUpload/')


What is MIDDLEWARE found on settings.py?
help to inject code that will be executed at specific points of the HTTP request/response cycle.
by default we have the next middleware

MIDDLEWARE = [
    'django.middleware.security.SecurityMiddleware',
    'django.contrib.sessions.middleware.SessionMiddleware',
    'django.middleware.common.CommonMiddleware',
    'django.middleware.csrf.CsrfViewMiddleware',
    'django.contrib.auth.middleware.AuthenticationMiddleware',
    'django.contrib.messages.middleware.MessageMiddleware',
    'django.middleware.clickjacking.XFrameOptionsMiddleware',
]


What is context_processors inside TEMPLATES in settings.py?

Context processors are a way to inject additional variables in the scope of templates. By doing so, you would not have to do it in every view that requires these variables.

for example allow template to access MEDIA_URL

            'context_processors': [
                'django.template.context_processors.debug',
                'django.template.context_processors.request',
                'django.contrib.auth.context_processors.auth',
                'django.contrib.messages.context_processors.messages',
                'django.template.context_processors.media',   #to use {{ MEDIA_URL }} in templates
            ],


Configure Django default DB using settings.py?

1) For postgresql,you need to
      a) install the PostgreSQL drivers
      b) run pipenv install psycopg2 
      c) update setting.py
DATABASES = {
    'default': {
        'NAME': 'app_data',
        'ENGINE': 'django.db.backends.postgresql',
        'USER': 'postgres_user',
        'PASSWORD': 'xxxx'
        }
     }

2) For mysql,you need to
      a)  install mysql drivers
      b)  run pipenv install mysqlclient
  c) update setting.py
DATABASES = {
    'default': {
        'NAME': 'user_data',
        'ENGINE': 'django.db.backends.mysql',
        'USER': 'mysql_user',
        'PASSWORD': 'xxxx',
        'HOST': '127.0.0.1',
        'PORT': '3306',
        'charset':'utf8',
        'use_unicode':'True'
        }
     }


View Can be method or Class

urls.py

path('Messages1/', view.MyFormView.as_view(), name='MyFormView'),
path('Messages2/', view. myview, name='myview'),


View.py

def myview(request):
    if request.method == "POST":
        form = form_class(request.POST)
        if form.is_valid():
            return HttpResponseRedirect('/success/')
    else:
        form = MyForm(initial={'key': 'value'})

    return render(request, 'form_template.html', {'form': form})


class MyFormView(View):
    template_name = 'form_template.html'

    def get(self, request):
        return render(request, self.template_name, {'form': form})

    def post(self, request):
        form = form_class(request.POST)
        if form.is_valid():
            return HttpResponseRedirect('/success/')

        return render(request, self.template_name, {'form': form})


Create a Login Screen


Create File Upload


Sample Complete Code


Model

class User(models.Model):
username = models.CharField(max_length=100, blank=True)
email = models.CharField(max_length=100, blank=True)
password = models.CharField(max_length=100, blank=True)
class Profile(models.Model):
user = models.OneToOneField(User, on_delete=models.CASCADE)
company = models.CharField(max_length=30, blank=True)
company_site = models.URLField(blank=True)
profile_pic = models.ImageField(upload_to='profile_pics',blank=True)


Form

class ProfileForm(forms.ModelForm):
class Meta:
model = Profile
fields = ['company', 'company_site', 'profile_pic']


class RegisterForm(forms.ModelForm):
username = forms.CharField(max_length=100,label='User Name',
widget=forms.TextInput(
attrs={
"class":"form-control",
"placeholder":"Your Username"
}
)
)
email = forms.EmailField(max_length=100)
password = forms.CharField(widget=forms.PasswordInput)

class Meta:
model = User
fields = ['username', 'email', 'password']

def clean_username(self):
username=self.cleaned_data.get("username")
qs=User.objects.filter(username=username)
if qs.exists():
raise forms.ValidationError("Username is taken")
return username
def clean_email(self):
email=self.cleaned_data.get("email")
qs=User.objects.filter(email=email)
if qs.exists():
raise forms.ValidationError("email is taken")
return email


View


@transaction.atomic
def NewUser(request):
if request.method == 'POST':
user_form = RegisterForm(request.POST or None)
profile_form = ProfileForm(request.POST or None )
if user_form.is_valid() and profile_form.is_valid():
user = user_form.save()
user.set_password(user.password)
user.save()

profile = profile_form.save(commit=False)
profile.user = user

if 'profile_pic' in request.FILES:
print('found it')
profile.profile_pic = request.FILES['profile_pic']


profile.save()
messages.success(request, 'Your profile was successfully updated!')

return redirect('z3950:newuser')
else:
messages.error(request, 'Please correct the error below.')
else:
user_form = RegisterForm() #instance=request.user
profile_form = ProfileForm() #instance=request.user.profile
return render(request, 'z3950/newuser.html', {
'user_form': user_form,
'profile_form': profile_form
})


Template


HomeForm.html


<html> <head>
<title>
{% block title %}
Edit My Profile
{% endblock%}
</title>
</head> <Body> {% if messages %}
<div class="alert alert-secondary" role="alert">
{% for message in messages %}
{{ message }}
{% endfor %}
</div>
{% endif %} {% block Contents %}

{% endblock %} </body> </html>


newuser.html


{% extends 'HomeForm.html' %}

{% block title %}
Edit My Profile
{% endblock%}

{% block Contents %}
{% if user_form.errors or profile_form.errors %}
<div class="alert alert-danger" role="alert">
{{user_form.errors}}
{{profile_form.errors}}
</div>
{% endif %}

<div class="row">

<div class="col-lg-12">
<div class="card">
<div class="card-header d-flex align-items-center">
<h4>Edit My User Info.</h4>
</div>
<div class="card-body">
<form class="form-horizontal" method="POST" action="" enctype="multipart/form-data">
{% csrf_token%}

{%for field in user_form %}
<div class="form-group row">
<label class="col-sm-2 form-control-label">{{field.label_tag}}</label>
<div class="col-sm-10">
<div class="input-group">
{{field}}
<div class="invalid-feedback">{{field.errors}}</div>
</div>
</div>
</div>
{%endfor%}
{%for field in profile_form %}
<div class="form-group row">
<label class="col-sm-2 form-control-label">{{field.label_tag}}</label>
<div class="col-sm-10">
<div class="input-group">
{{field}}
<div class="invalid-feedback">{{field.errors}}</div>
</div>
</div>
</div>
{%endfor%}


<div class="form-group row">
<div class="col-sm-4 offset-sm-2">
<button type="submit" class="btn btn-primary">Submit</button>
<button type="reset" class="btn btn-secondary">Reset</button>
</div>
</div>
</form>
</div>
</div>
</div>

</div>


{% endblock %}

Sunday, April 7, 2019

Deploy dJango code


Use Kubernetes to deploy docker for load balance


Step 1: Prepare machine for Kubernetes 


$ brew cask install minikube
$ brew install kubectl
$ minikube start
$ minikube status

Utilize the docker daemon within minikube
normally you build docker image, then push to Kubernetes but When using a single VM of Kubernetes, it’s really handy to reuse the Minikube’s built-in Docker daemon; as this means you don’t have to build a docker registry on your host machine and push the image into it - you can just build inside the same docker daemon as minikube which speeds up local experiments. Just make sure you tag your Docker image with something other than ‘latest’ and use that tag while you pull the image.

$ eval $(minikube docker-env)
$ kubectl config current-context


$ minikube dashboard

Step 2: Prepare Dockers

we need to define 4 dockers
1) Nginx: will serve static files
2) Django/Gunicorn : Gunicorn will serve python files
3) DB: mysql
4) Solr 


2.1) Select Docker Base image 
The python images come in many flavors, each designed for a specific use case.

2.1.a) python:<version> : It has a large number of extremely common Debian packages. This reduces the number of packages that images that derive from it need to install.

2.1.b) python:<version>-slim: only contains the minimal packages needed to run python

2.1.c) python:<version>-alpine: image based on Alpine images [size is ~5MB], Alpine use musl libc instead of glibc. so certain software might run into issues depending on the depth of their libc requirements. However, most software doesn't have an issue with this


2.2) Gunicorn configuration

Gunicorn should only need 4-12 worker processes to handle hundreds or thousands of requests per second. Generally we recommend (2 x $num_cores) + 1 as the number of workers to start off with. 
2.3) NGINX Configurationa)
2.3.a) worker_processes
– The number of NGINX worker processes (the default is 1). In most cases, running one worker process per CPU core works well, and we recommend setting this directive to auto to achieve that. There are times when you may want to increase this number, such as when the worker processes have to do a lot of disk I/O.

Get number of cores 
available
grep processor /proc/cpuinfo | wc -l

2.3.b) worker_connections – The maximum number of connections that each worker process can handle simultaneously. The default is 512, but most systems have enough resources to support a larger number. The appropriate setting depends on the size of the server and the nature of the traffic, and can be discovered through testing.
Get connections that 
can simultaneously be served using the next command
ulimit -n

=======================
Prepare Dockers:
a) Prepare Django Docker


Create folder with name "django-docker" (mkdir django-docker) contains file "Dockerfile" (touch Dockerfile), and requirements.txt

Dockerfile File contents:

FROM python:3.6.7-alpine
ENV PYTHONUNBUFFERED 1
RUN mkdir /code
WORKDIR /code
ADD requirements.txt /code/
RUN pip install -r requirements.txt
ADD ./ /code/
CMD ["python", "mysite/manage.py", "runserver", "0.0.0.0:8001"]


requirements.txt File contents:
beautifulsoup4==4.7.1
bs4==0.0.1
certifi==2019.3.9
chardet==3.0.4
Django==2.1.7
gunicorn==19.9.0
djangorestframework==3.9.2
html5lib==1.0.1
idna==2.8
lxml==4.3.2
numpy==1.16.2
pandas==0.24.2
Pillow==5.4.1
pymarc==3.1.12
PyMySQL==0.9.3
pysolr==3.8.1
python-dateutil==2.8.0
pytz==2018.9
requests==2.21.0
six==1.12.0
soupsieve==1.8
urllib3==1.24.1
webencodings==0.5.1

Build docker
$ docker build -t django-docker:0.0.1 .

Run docker and expose port 8001
$ docker run -p 8001:8001 docker-django:0.0.1

Now user can view the django project by visit  http://localhost:8001

================================


Automate build process using docker compose

1) Create a ymal file (touch docker-compose.yml)
File contents:
version: '3'

services:
  web:
    build: ./django-docker/
    command: python mysite/manage.py runserver 8001
    ports:
      - "8001:8001"

2) Remove CMD from ./django-docker/Dockerfile because ymal file do that now.

3) Build then Run the Docker

$ docker-compose build
$ docker-compose up -d

3.1) When you have two yaml files, you can choose the yaml for build and up
$ docker-compose -f production.yml up -d

3.2) List current active containers
$ docker-compose ps

3.3) To see which environment variables are available to the web service, run:
$ docker-compose run web env

3.4) To view the logs:
$ docker-compose logs

3.5) to stop docker
$ docker-compose down

4) to run bash commands against docker

$ docker-compose exec web bash 

Common Django tasks:
$ docker-compose exec web python mysite/manage.py migrate
$ docker-compose exec web python mysite/manage.py createsuperuser

Note:
Docker content should be readonly and if we have a dynamic data we can map docker folder to a container folder to keep changes.

ie, in yaml file map /TargetDir directory to container /ContainerDir directory
volumes:
  - /TargetDir : /ContainerDir


b) Create DB docker

update ymal file and connect to web docker


db:
    image: mysql:5.7
    restart: always
    environment:
      MYSQL_DATABASE: 'db'
      MYSQL_USER: 'user'
      MYSQL_PASSWORD: 'password'
      MYSQL_ROOT_PASSWORD: 'password'
    ports:
      - '3306:3306'
    expose:
      - '3306'
    volumes:
      - my-db:/var/lib/mysql
    networks:
      - backend

networks:
  backend:
    driver: bridge

the ymal file contains passwords and it is better to keep out side ymal file, .env is the best  place

create .env file in the same yaml directory
MYSQL_DATABASE =ddl
MYSQL_USER=user1
MYSQL_PASSWORD =root
MYSQL_ROOT_PASSWORD =root
DB_SERVICE=DB


use ${Variable Name} to read any value from .env file inside yaml file

So, the ymal file can be

db:
    image: mysql:5.7
    restart: always
    environment:
      MYSQL_DATABASE: ${MYSQL_DATABASE}
      MYSQL_USER: ${MYSQL_USER}
      MYSQL_PASSWORD: ${MYSQL_PASSWORD}
      MYSQL_ROOT_PASSWORD: ${MYSQL_ROOT_PASSWORD}
    ports:
      - '3306:3306'
    expose:
      - '3306'
    volumes:
      - my-db:/var/lib/mysql
    networks:
      - backend

networks:
  backend:
    driver: bridge


c) Create nginx load balancer docker

Create folder with name "nginx" (mkdir nginx) contains file "Dockerfile" (touch Dockerfile)

Dockerfile contents

FROM nginx:latest
RUN rm /etc/nginx/sites-enabled/default
COPY default    /etc/nginx/sites-enabled/default

default file contents

server {

    listen 80;
    server_name localhost;
    charset utf-8;

    location /static {
        alias /usr/src/app/static;
    }

    location / {
        proxy_pass http://web:8000;
        proxy_set_header Host $host;
        proxy_set_header X-Real-IP $remote_addr;
        proxy_set_header X-Forwarded-For $proxy_add_x_forwarded_for;
    }

}


The Final ymal file
yaml file that configure django, DB,  and nginx will look like


version: "3"

services:

  web:
    restart: always
    build: ./django-docker/
    expose:
      - "8000"
    ports:
      - "8000:8000"
    depends_on:
      - db
    networks:
      - backend
    volumes:
      - web-django:/usr/src/app
      - web-static:/usr/src/app/static
    env_file: .env
    environment:
      DEBUG: 'true'
    command: /usr/local/bin/gunicorn ddlDjango.wsgi:application -w 2 -b :8000


  db:
    image: mysql:5.7
    restart: always
    environment:
      MYSQL_DATABASE: 'db'
      MYSQL_USER: 'user'
      MYSQL_PASSWORD: 'password'
      MYSQL_ROOT_PASSWORD: 'password'
    ports:
      - '3306:3306'
    expose:
      - '3306'
    volumes:
      - my-db:/var/lib/mysql
    networks:
      - backend


  nginx:
    restart: always
    build: ./nginx/
    ports:
      - "80:80"
    volumes:
      - web-static:/www/static
    networks:
      - backend

networks:
  backend:
    driver: bridge


Notes:
1) network: When containers are placed in the same network, they are reachable by each other using their container name and other alias as host.

2) depends_on: expresses start order (and implicitly image pulling order)

3) ports: maps container port to the host.

4) EXPOSE: opens the port in the container, making it accessible by other containers. but not accessible to the host (does not actually publish the port)

5) env_file: .env  read the contents of .env file and send to docker as an environmental variable

6) environment: send the given key/values pairs to docker as an environmental variable
    and you can read these values later inside settings.py using os.environ.get (Key, DefaultValue)

setting.py dynamic line example :

import os
SECRET_KEY = os.environ.get('SECRET_KEY','sdfgtw54sdgsdfgsdfgsdfgsfd')


==========

Kubernetes based on dockers

To Deploy docker on Kubernetes, we need to convert existing Docker Compose yaml files into the necessary Kubernetes configuration.
which means created a Kubernetes deployment and a Kubernetes service for every container that had an exposed port.


Thursday, March 7, 2019

Prepare your machine for django development


sudo apt-get update
sudo apt-get install python3-pip
sudo pip3 install django
django-admin --version

django-admin startproject projectname
cd projectname
python3 manage.py makemigrations
python3 manage.py migrate

python3 manage.py createsuperuser

python3 manage.py startapp NewApp
python3 manage.py makemigrations NewApp
python3 manage.py migrate

nano ~/projectname/projectname/settings.py
         ALLOWED_HOSTS = ['your_server_domain_or_IP']

python3 manage.py runserver 0.0.0.0:8000

Run http://127.0.0.1:8000/admin to see django start admin page

Notes:
To create a shortcut command ie p3 for python3
alias p3=python3

To get the default mysql port run the sql command
mysql> SHOW VARIABLES WHERE Variable_name = 'port';

Add privileges to new user
GRANT ALL ON *.* TO root@'202.54.10.20' IDENTIFIED BY 'PASSWORD';

when change any python file reload the application using command

service apache2 reload

Prepare Apache server for django deploy


Go inside default apache www directory ( ie     /var/www/html/   )
cd /var/www/html/
sudo apt-get install python3-pip apache2 libapache2-mod-wsgi-py3

sudo pip3 install virtualenv

mkdir ~/myproject
cd ~/myproject

virtualenv myprojectenv
source myprojectenv/bin/activate

Note
Regardless of whether you are using Python 2 or Python 3, when the virtual environment is activated, we should use the pip command (not pip3).
later when work with this project you should activate the virtual env using command "source myprojectenv/bin/activate", virtualenv  keep the dependencies for each project separate.

pip install django

django-admin.py startproject myproject .


nano myproject/settings.py

. . .
ALLOWED_HOSTS = ["server_domain_or_IP"]
. . .

STATIC_URL = '/static/'
STATIC_ROOT = os.path.join(BASE_DIR, 'static/')

./manage.py makemigrations
./manage.py migrate
./manage.py createsuperuser

Configure Apache

sudo nano /etc/apache2/sites-available/000-default.conf

<VirtualHost *:80>
    . . .

    Alias /static /var/www/html/myproject/static
    <Directory /var/www/html/myproject/static>
        Require all granted
    </Directory>

    <Directory /home/sammy/myproject/myproject>
        <Files wsgi.py>
            Require all granted
        </Files>
    </Directory>

    WSGIDaemonProcess myproject 
                                  python-home= /var/www/html/myproject/myprojectenv 
                                  python-path= /var/www/html/myproject/
    WSGIProcessGroup myproject
WSGIScriptAlias / /home/sammy/myproject/myproject/wsgi.py

</VirtualHost>


After update apache configuration validate it using the next command
sudo apache2ctl configtest

sudo systemctl restart apache2