React Native Example
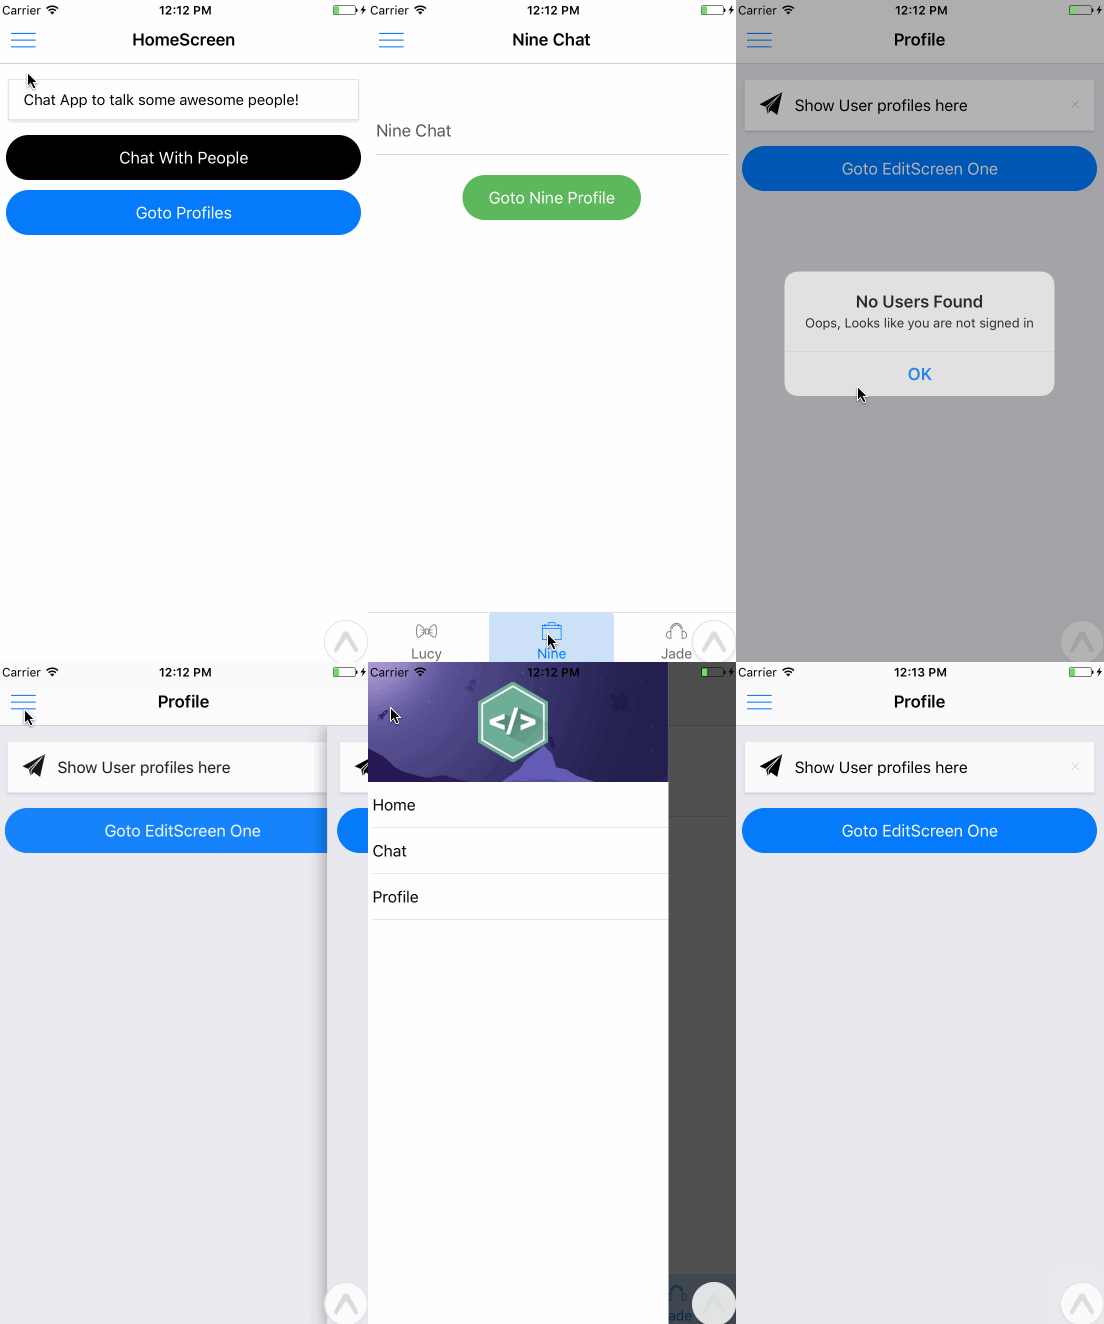
React native application contains 3-pages
Using
NativeBase as the UI library to design our pages.
3-pages application contains buttons on each page that takes us to the other page onPress.
to download the full code for this project https://github.com/GeekyAnts/native-base-react-navigation-stack-navigator
Installation
- Create React Native App: Use CRNA tool to create an App like this
$ npm install -g create-react-native-app
$ create-react-native-app my-app
$ cd my-app/
$ npm start
- Installing Libraries
With a React Native project SetUp, We can now install all required Libraries as follows.
a. React Navigation
npm install --save react-navigation
b. NativeBase
npm install native-base --save
c. Configure dependencies
react-native link
By the end of Installation, your package.json file should look something like this.
Lets Play
With our basic project setup we can now start building our App.
Make a folder at the project root by the name of src.
Inside this folder we make 3 folders:
- ChatScreen
- HomeScreen
- ProfileScreen
HomeScreen
This is going to be the first landing screen of out App. We are going to implement the navigation logic here.
For our purpose here, we have used DrawerNavigator for navigation through the entire app.
Further screens will have nested navigators in them.
Go ahead and add the following file in your project.
Code HomeScreen/HomeScreen.js
import React from "react";
import { StatusBar } from "react-native";
import { Container, Header, Title, Left, Icon, Right, Button, Body, Content,Text, Card, CardItem } from "native-base";
export default class HomeScreen extends React.Component {
  render() {
    return (
      <Container>
        <Header>
          <Left>
            <Button
              transparent
              onPress={() => this.props.navigation.navigate("DrawerOpen")}>
              <Icon name="menu" />
            </Button>
          </Left>
          <Body>
            <Title>HomeScreen</Title>
          </Body>
          <Right />
        </Header>
        <Content padder>
          <Card>
            <CardItem>
              <Body>
                <Text>Chat App to talk some awesome people!</Text>
              </Body>
            </CardItem>
          </Card>
          <Button full rounded dark
            style={{ marginTop: 10 }}
            onPress={() => this.props.navigation.navigate("Chat")}>
            <Text>Chat With People</Text>
          </Button>
          <Button full rounded primary
            style={{ marginTop: 10 }}
            onPress={() => this.props.navigation.navigate("Profile")}>
            <Text>Goto Profiles</Text>
          </Button>
        </Content>
      </Container>
    );
  }
}
Explained
- Here we have simply added some buttons, each to
openDrawer or navigate to other components.
- The navigation object is available as a prop to us as we declare this component inside a DrawerNavigator in index.js.
Code HomeScreen/index.js
import React, { Component } from "react";
import HomeScreen from "./HomeScreen.js";
import MainScreenNavigator from "../ChatScreen/index.js";
import Profile from "../ProfileScreen/index.js";
import SideBar from "../SideBar/SideBar.js";
import { DrawerNavigator } from "react-navigation";
const HomeScreenRouter = DrawerNavigator(
  {
    Home: { screen: HomeScreen },
    Chat: { screen: MainScreenNavigator },
    Profile: { screen: Profile }
  },
  {
    contentComponent: props => <SideBar {...props} />
  }
);
export default HomeScreenRouter;
Explained
- Here we have simply imported all the screens we will be needing. We will be building these screens in the comming sections. These screens in fact are router components which themselves have multiple screens.
- We pass the screens to the DrawerNavigator as shown above.
- Note how we have used a custom NativeBase components using customComponent prop and we pass our custom drawer component.
SideBar
This is going to be our custom drawer component where we put buttons to navigate to different screens available.
Navigation object is available as this.props.navigation since we passed the props in the HomeScreen component.
Code SideBar/SideBar.js
import React from "react";
import { AppRegistry, Image, StatusBar } from "react-native";
import { Container, Content, Text, List, ListItem } from "native-base";
const routes = ["Home", "Chat", "Profile"];
export default class SideBar extends React.Component {
  render() {
    return (
      <Container>
        <Content>
          <Image
            source={{
              uri: "https://github.com/GeekyAnts/NativeBase-KitchenSink/raw/react-navigation/img/drawer-cover.png"
            }}
            style={{
              height: 120,
              alignSelf: "stretch",
              justifyContent: "center",
              alignItems: "center"
            }}>
            <Image
              square
              style={{ height: 80, width: 70 }}
              source={{
                uri: "https://github.com/GeekyAnts/NativeBase-KitchenSink/raw/react-navigation/img/logo.png"
              }}
            />
          </Image>
          <List
            dataArray={routes}
            renderRow={data => {
              return (
                <ListItem
                  button
                  onPress={() => this.props.navigation.navigate(data)}>
                  <Text>{data}</Text>
                </ListItem>
              );
            }}
          />
        </Content>
      </Container>
    );
  }
}
ChatScreen
This screen comprises of TabNavigator component. We are going to have three screens here to chat to three different people.
We will also create our own custom component for Tabs. Its done as follows.
Code ChatScreen/index.js
import React, { Component } from "react";
import LucyChat from "./LucyChat.js";
import JadeChat from "./JadeChat.js";
import NineChat from "./NineChat.js";
import { TabNavigator } from "react-navigation";
import { Button, Text, Icon, Footer, FooterTab } from "native-base";
export default (MainScreenNavigator = TabNavigator(
  {
    LucyChat: { screen: LucyChat },
    JadeChat: { screen: JadeChat },
    NineChat: { screen: NineChat }
  },
  {
    tabBarPosition: "bottom",
    tabBarComponent: props => {
      return (
        <Footer>
          <FooterTab>
            <Button
              vertical
              active={props.navigationState.index === 0}
              onPress={() => props.navigation.navigate("LucyChat")}>
              <Icon name="bowtie" />
              <Text>Lucy</Text>
            </Button>
            <Button
              vertical
              active={props.navigationState.index === 1}
              onPress={() => props.navigation.navigate("JadeChat")}>
              <Icon name="briefcase" />
              <Text>Nine</Text>
            </Button>
            <Button
              vertical
              active={props.navigationState.index === 2}
              onPress={() => props.navigation.navigate("NineChat")}>
              <Icon name="headset" />
              <Text>Jade</Text>
            </Button>
          </FooterTab>
        </Footer>
      );
    }
  }
));
Explained
- We have simply imported three screens to work as Tabs as shown above.
- We pass these screens to TabNavigator component.
- Notice how we pass our Tab component through tabBarComponent prop.
- Navigation is available as props.
Sample screen
Code ChatScreen/LucyChat.js
import React from "react";
import { AppRegistry, View, StatusBar } from "react-native";
import { Container, Body, Content, Header, Left, Right, Icon, Title, Input, Item, Label, Button, Text } from "native-base";
import HomeScreen from "../HomeScreen";
export default class LucyChat extends React.Component {
  render() {
    const { navigate } = this.props.navigation;
    return (
      <Container>
        <Header>
          <Left>
            <Button
              transparent
              onPress={() => this.props.navigation.navigate("DrawerOpen")}>
              <Icon name="menu" />
            </Button>
          </Left>
          <Body>
            <Title>Lucy Chat</Title>
          </Body>
          <Right />
        </Header>
        <Content padder>
          <Item floatingLabel style={{ marginTop: 20 }}>
            <Label>Lucy Chat</Label>
            <Input />
          </Item>
          <Button rounded danger
            style={{ marginTop: 20, alignSelf: "center" }}
            onPress={() => navigate("Profile")}>
            <Text>Goto Lucy Profile</Text>
          </Button>
        </Content>
      </Container>
    );
  }
}
Profile
This screen includes example for StackNavigation.
Code ProfileScreen/index.js
import React, { Component } from "react";
import Profile from "./Profile.js";
import EditScreenOne from "./EditScreenOne.js";
import EditScreenTwo from "./EditScreenTwo.js";
import { StackNavigator } from "react-navigation";
export default (DrawNav = StackNavigator({
  Profile: { screen: Profile },
  EditScreenOne: { screen: EditScreenOne },
  EditScreenTwo: { screen: EditScreenTwo }
}));
Code ProfileScreen/Profile.js
import React from "react";
import { AppRegistry, Alert } from "react-native";
import { Container, Header, Left, Body, Title, Card, CardItem, Content, Right, Icon, Button, Text } from "native-base";
import { StackNavigator } from "react-navigation";
import EditScreenOne from "./EditScreenOne.js";
import EditScreenTwo from "./EditScreenTwo.js";
export default class Profile extends React.Component {
  componentDidMount() {
    Alert.alert("No Users Found", "Oops, Looks like you are not signed in");
  }
  render() {
    return (
      <Container>
        <Content padder>
          <Card>
            <CardItem>
              <Icon active name="paper-plane" />
              <Text>Show User profiles here</Text>
              <Right>
                <Icon name="close" />
              </Right>
            </CardItem>
          </Card>
          <Button full rounded primary
            style={{ marginTop: 10 }}
            onPress={() => this.props.navigation.navigate("EditScreenOne")}>
            <Text>Goto EditScreen One</Text>
          </Button>
        </Content>
      </Container>
    );
  }
}
Profile.navigationOptions = ({ navigation }) => ({
  header: (
    <Header>
      <Left>
        <Button transparent onPress={() => navigation.navigate("DrawerOpen")}>
          <Icon name="menu" />
        </Button>
      </Left>
      <Body>
        <Title>Profile</Title>
      </Body>
      <Right />
    </Header>
  )
});
Explained
- We have Navigation as a StackNavigation prop here. In the UI, we have different buttons to navigate to screens on stack. Notice how we imported screens above.
- Notice how we passed the DrawerNavigator prop inside our Profile screen header above.
Code ProfileScreen/EditScreenOne.js
This screen is a simple part of StackNavigation, we have a header with a back button as shown below.
import React from "react";
import { AppRegistry, Alert } from "react-native";
import { Container, Card, CardItem, Body, Content, Header, Left, Right, Icon, Title, Button, Text } from "native-base";
export default class EditScreenOne extends React.Component {
  static navigationOptions = ({ navigation }) => ({
    header: (
      <Header>
        <Left>
          <Button transparent onPress={() => navigation.goBack()}>
            <Icon name="arrow-back" />
          </Button>
        </Left>
        <Body>
          <Title>EditScreenOne</Title>
        </Body>
        <Right />
      </Header>
    )
  });
  render() {
    return (
      <Container>
        <Content padder>
          <Card>
            <CardItem>
              <Icon active name="paper-plane" />
              <Text>Edit Screen 1</Text>
              <Right>
                <Icon name="close" />
              </Right>
            </CardItem>
          </Card>
          <Button full rounded primary
            style={{ marginTop: 10 }}
            onPress={() => this.props.navigation.navigate("EditScreenTwo")}>
            <Text>Goto EditScreenTwo</Text>
          </Button>
        </Content>
      </Container>
    );
  }
}
Finishing up
Lastly we import our
routes component from
HomeScreen to our
App.js file as shown.
Note how we have loaded fonts for
NativeBase since we have used expo here.
Code App.js
import React, { Component } from "react";
import Expo from "expo";
import HomeScreen from "./src/HomeScreen/index.js";
export default class AwesomeApp extends Component {
  constructor() {
    super();
    this.state = {
      isReady: false
    };
  }
  async componentWillMount() {
    await Expo.Font.loadAsync({
      Roboto: require("native-base/Fonts/Roboto.ttf"),
      Roboto_medium: require("native-base/Fonts/Roboto_medium.ttf"),
      Ionicons: require("native-base/Fonts/Ionicons.ttf")
    });
    this.setState({ isReady: true });
  }
  render() {
    if (!this.state.isReady) {
      return <Expo.AppLoading />;
    }
    return <HomeScreen />;
  }
}
All has been taken care of now. Build and run.
Here is the full code in one page (App.js)
import React, { Component } from "react";
import { Container, Header, Title, Left, Icon, Right, Button, Body, Content,Text, Card, CardItem } from "native-base";
import { List, ListItem } from "native-base";
import { Input, Item, Label } from "native-base";
import { Image } from "react-native";
import { Alert } from "react-native";
import { StackNavigator } from "react-navigation";
//#region SideBar
const routes = ["Home", "Chat", "Profile"];
class SideBar extends React.Component {
render() {
return (
<Container>
<Content>
<Image
source={{
uri: "http://placehold.it/600/771796"
}}
style={{
height: 10,
alignSelf: "stretch",
justifyContent: "center",
alignItems: "center"
}} />
<Image
square
style={{ height: 80, width: 70 }}
source={{
uri: "http://www.reactnativeexpress.com/logo.png"
}}
/>
<List
dataArray={routes}
renderRow={data => {
return (
<ListItem
button
onPress={() => this.props.navigation.navigate(data)}>
<Text>{data}</Text>
</ListItem>
);
}}
/>
</Content>
</Container>
);
}
}
//#endregion
//==============================================
//#region LucyChat JadeChat NineChat
class LucyChat extends React.Component {
render() {
const { navigate } = this.props.navigation;
return (
<Container>
<Header>
<Left>
<Button
transparent
onPress={() => this.props.navigation.navigate("DrawerOpen")}>
<Icon name="menu" />
</Button>
</Left>
<Body>
<Title>Lucy Chat</Title>
</Body>
<Right />
</Header>
<Content padder>
<Item floatingLabel style={{ marginTop: 20 }}>
<Label>Lucy Chat</Label>
<Input />
</Item>
<Button rounded danger
style={{ marginTop: 20, alignSelf: "center" }}
onPress={() => navigate("Profile")}>
<Text>Goto Lucy Profile</Text>
</Button>
</Content>
</Container>
);
}
}
class JadeChat extends React.Component {
render() {
const { navigate } = this.props.navigation;
return (
<Container>
<Header>
<Left>
<Button
transparent
onPress={() => this.props.navigation.navigate("DrawerOpen")}>
<Icon name="menu" />
</Button>
</Left>
<Body>
<Title>Jade Chat</Title>
</Body>
<Right />
</Header>
<Content padder>
<Item floatingLabel style={{ marginTop: 20 }}>
<Label>Jade Chat</Label>
<Input />
</Item>
<Button rounded danger
style={{ marginTop: 20, alignSelf: "center" }}
onPress={() => navigate("Profile")}>
<Text>Goto Jade Profile</Text>
</Button>
</Content>
</Container>
);
}
}
class NineChat extends React.Component {
render() {
const { navigate } = this.props.navigation;
return (
<Container>
<Header>
<Left>
<Button
transparent
onPress={() => this.props.navigation.navigate("DrawerOpen")}>
<Icon name="menu" />
</Button>
</Left>
<Body>
<Title>NineChat</Title>
</Body>
<Right />
</Header>
<Content padder>
<Item floatingLabel style={{ marginTop: 20 }}>
<Label>NineChat</Label>
<Input />
</Item>
<Button rounded danger
style={{ marginTop: 20, alignSelf: "center" }}
onPress={() => navigate("Profile")}>
<Text>Goto Nine Profile</Text>
</Button>
</Content>
</Container>
);
}
}
//#endregion
//==============================================
//#region MainScreenNavigator
import { TabNavigator } from "react-navigation";
import { Footer, FooterTab } from "native-base";
const MainScreenNavigator = TabNavigator(
{
LucyChat: { screen: LucyChat },
JadeChat: { screen: JadeChat },
NineChat: { screen: NineChat }
},
{
tabBarPosition: "bottom",
tabBarComponent: props => {
return (
<Footer>
<FooterTab>
<Button
vertical
active={props.navigationState.index === 0}
onPress={() => props.navigation.navigate("LucyChat")}>
<Icon name="bowtie" />
<Text>Lucy</Text>
</Button>
<Button
vertical
active={props.navigationState.index === 1}
onPress={() => props.navigation.navigate("JadeChat")}>
<Icon name="briefcase" />
<Text>Nine</Text>
</Button>
<Button
vertical
active={props.navigationState.index === 2}
onPress={() => props.navigation.navigate("NineChat")}>
<Icon name="headset" />
<Text>Jade</Text>
</Button>
</FooterTab>
</Footer>
);
}
}
);
//#endregion
//==============================================
//#region EditScreenOne EditScreenTwo
class EditScreenOne extends React.Component {
static navigationOptions = ({ navigation }) => ({
header: (
<Header>
<Left>
<Button transparent onPress={() => navigation.goBack()}>
<Icon name="arrow-back" />
</Button>
</Left>
<Body>
<Title>EditScreenOne</Title>
</Body>
<Right />
</Header>
)
});
render() {
return (
<Container>
<Content padder>
<Card>
<CardItem>
<Icon active name="paper-plane" />
<Text>Edit Screen 1</Text>
<Right>
<Icon name="close" />
</Right>
</CardItem>
</Card>
<Button full rounded primary
style={{ marginTop: 10 }}
onPress={() => this.props.navigation.navigate("EditScreenTwo")}>
<Text>Goto EditScreenTwo</Text>
</Button>
</Content>
</Container>
);
}
}
class EditScreenTwo extends React.Component {
static navigationOptions = ({ navigation }) => ({
header: (
<Header>
<Left>
<Button transparent onPress={() => navigation.goBack()}>
<Icon name="arrow-back" />
</Button>
</Left>
<Body>
<Title>EditScreenTwo</Title>
</Body>
<Right />
</Header>
)
});
render() {
return (
<Container>
<Content padder>
<Card>
<CardItem>
<Icon active name="paper-plane" />
<Text>Edit Screen 2</Text>
<Right>
<Icon name="close" />
</Right>
</CardItem>
</Card>
<Button full rounded primary
style={{ marginTop: 10 }}
onPress={() => this.props.navigation.navigate("EditScreenOne")}>
<Text>Goto EditScreenOne</Text>
</Button>
</Content>
</Container>
);
}
}
//#endregion
//==============================================
//#region Profile
class Profile extends React.Component {
componentDidMount() {
Alert.alert("No Users Found", "Oops, Looks like you are not signed in");
}
render() {
return (
<Container>
<Content padder>
<Card>
<CardItem>
<Icon active name="paper-plane" />
<Text>Show User profiles here</Text>
<Right>
<Icon name="close" />
</Right>
</CardItem>
</Card>
<Button full rounded primary
style={{ marginTop: 10 }}
onPress={() => this.props.navigation.navigate("EditScreenOne")}>
<Text>Goto EditScreen One</Text>
</Button>
</Content>
</Container>
);
}
}
Profile.navigationOptions = ({ navigation }) => ({
header: (
<Header>
<Left>
<Button transparent onPress={() => navigation.navigate("DrawerOpen")}>
<Icon name="menu" />
</Button>
</Left>
<Body>
<Title>Profile</Title>
</Body>
<Right />
</Header>
)
});
//#endregion
//==============================================
//#region DrawNav
const EditProfileNavigator = StackNavigator({
Profile: { screen: Profile },
EditScreenOne: { screen: EditScreenOne },
EditScreenTwo: { screen: EditScreenTwo }
});
//#endregion
//==============================================
//#region HomeScreen
class HomeScreen extends React.Component {
render() {
return (
<Container>
<Header>
<Left>
<Button
transparent
onPress={() => this.props.navigation.navigate("DrawerOpen")}>
<Icon name="menu" />
</Button>
</Left>
<Body>
<Title>HomeScreen</Title>
</Body>
<Right />
</Header>
<Content padder>
<Card>
<CardItem>
<Body>
<Text>Chat App to talk some awesome people!</Text>
</Body>
</CardItem>
</Card>
<Button full rounded dark
style={{ marginTop: 10 }}
onPress={() => this.props.navigation.navigate("Chat")}>
<Text>Chat With People</Text>
</Button>
<Button full rounded primary
style={{ marginTop: 10 }}
onPress={() => this.props.navigation.navigate("Profile")}>
<Text>Goto Profiles</Text>
</Button>
</Content>
</Container>
);
}
}
//#endregion
//==============================================
//#region HomeScreenRouter
import { DrawerNavigator } from "react-navigation";
const HomeScreenRouter = DrawerNavigator(
{
Home: { screen: HomeScreen },
Chat: { screen: MainScreenNavigator },
Profile: { screen: EditProfileNavigator }
},
{
contentComponent: props => <SideBar {...props} />
}
);
//#endregion
//==============================================
//#region Start Loading Page
import Expo from "expo";
export default class DrawerMultiTabsNativeBase extends Component {
constructor() {
super();
this.state = {
isReady: false
};
}
async componentWillMount() {
await Expo.Font.loadAsync({
Roboto: require("native-base/Fonts/Roboto.ttf"),
Roboto_medium: require("native-base/Fonts/Roboto_medium.ttf"),
Ionicons: require("native-base/Fonts/Ionicons.ttf")
});
this.setState({ isReady: true });
}
render() {
if (!this.state.isReady) {
return <Expo.AppLoading />;
}
return <HomeScreenRouter />;
}
}
//#endregion
//==============================================