Terminology
1) Solr instance:Zero or more cores can be configured to run inside a Solr instance. Each Solr instance requires a reference to a separate Solr home directory.
2) Solr core: Each of your indexes and the files required by that index makes a core. So if your application requires multiple indexes, you can have multiple cores running inside a Solr instance
3) Solr home:directory that Solr refers to for almost everything. It contains all the information regarding the cores and their indexes, configurations, and dependencies.
4) Solr shard: This term is used in distributed environments, in which you partition the data between multiple Solr instances. Each chunk of data on a particular instance is called a shard. The shard contains a subset of the whole index. For example, say you have 30 million documents and plan to distribute these in three shards, each containing 10 million documents. You’ll need three Solr instances, each having one core with the same name and schema. While serving queries, any shard can receive the request and distribute it to the other two shards for processing, get all the results and respond back to the client with the merged result.
Solr types of distributed architecture:
1) master-slave architecture [old]: index is created on the master server, which is replicated to one or more slave servers dedicated to searching. This approach has several limitations
2) SolrCloud [new]: sets up a cluster of Solr servers to provide fault tolerance and high availability and to offer features such as distributed indexing, centralized configuration, automatic load balancing, and failover.
SolrCloud Terminology
Node: A single instance of Solr
Cluster: All the nodes in your environment together.
Collection: A complete logical index in a cluster.
Shard: A logical portion, or slice, of a collection.
Replica: The physical copy of a shard, which runs in a node as a Solr core.
Leader: Among all the replicas of a shard, one is elected as a leader. SolrCloud forwards all requests
to the leader of the shard, which distributes it to the replicas.
ZooKeeper: ZooKeeper is an Apache project widely used by distributed systems for centralized configuration and coordination. SolrCloud uses it for managing the cluster and electing a leader.
Launch a SolrCloud cluster on your local workstation
bin/solr start -e cloud
(run the previous command on solr home,to get the next questions, just accept defaults by press enter)
How many Solr nodes would you like to run in your local cluster (specify 1-4 nodes) [2]:?
Please enter the port for node1 [8983]:
Please enter the port for node2 [7574]:
Create a new collection, Please provide a name for your new collection [gettingstarted]:
How many shards would you like to split new collection into? [2]
How many replicas per shard would you like to create? [2]
Notice that
Two instances of Solr have started on two nodes, one on port 7574 and one on port 8983.
There is one collection created, a two shard collection, each with two replicas.
Solr Admin UI URL: http://localhost:8983/solr
Solr has two main configuration files: the schema file (named either managed-schema or schema.xml), and solrconfig.xml.
solrconfig.xml:
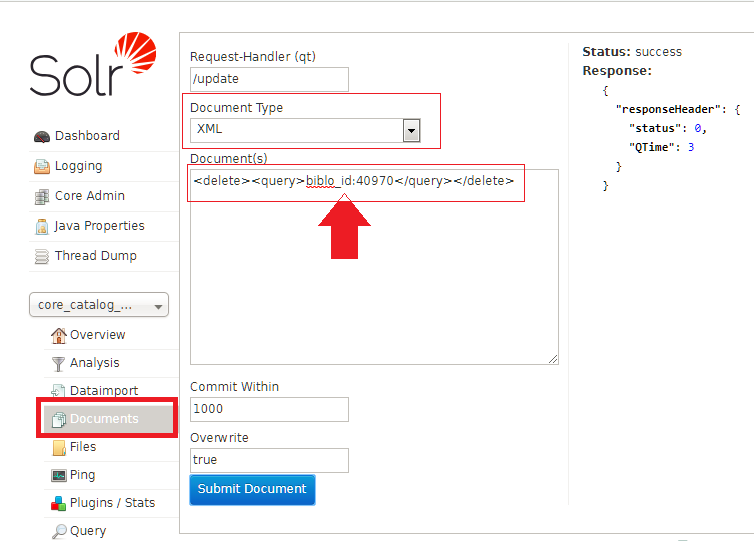
<delete><query>*:*</query></delete>

1) Solr instance:Zero or more cores can be configured to run inside a Solr instance. Each Solr instance requires a reference to a separate Solr home directory.
2) Solr core: Each of your indexes and the files required by that index makes a core. So if your application requires multiple indexes, you can have multiple cores running inside a Solr instance
3) Solr home:directory that Solr refers to for almost everything. It contains all the information regarding the cores and their indexes, configurations, and dependencies.
4) Solr shard: This term is used in distributed environments, in which you partition the data between multiple Solr instances. Each chunk of data on a particular instance is called a shard. The shard contains a subset of the whole index. For example, say you have 30 million documents and plan to distribute these in three shards, each containing 10 million documents. You’ll need three Solr instances, each having one core with the same name and schema. While serving queries, any shard can receive the request and distribute it to the other two shards for processing, get all the results and respond back to the client with the merged result.
Solr types of distributed architecture:
1) master-slave architecture [old]: index is created on the master server, which is replicated to one or more slave servers dedicated to searching. This approach has several limitations
2) SolrCloud [new]: sets up a cluster of Solr servers to provide fault tolerance and high availability and to offer features such as distributed indexing, centralized configuration, automatic load balancing, and failover.
SolrCloud Terminology
Node: A single instance of Solr
Cluster: All the nodes in your environment together.
Collection: A complete logical index in a cluster.
Shard: A logical portion, or slice, of a collection.
Replica: The physical copy of a shard, which runs in a node as a Solr core.
Leader: Among all the replicas of a shard, one is elected as a leader. SolrCloud forwards all requests
to the leader of the shard, which distributes it to the replicas.
ZooKeeper: ZooKeeper is an Apache project widely used by distributed systems for centralized configuration and coordination. SolrCloud uses it for managing the cluster and electing a leader.
SolrCloud
Apache Solr includes the ability to set up a cluster of Solr servers that combines fault tolerance and high availability. Called SolrCloud, these capabilities provide distributed indexing and search capabilities, supporting the following features:
- Central configuration for the entire cluster
- Automatic load balancing and fail-over for queries
- ZooKeeper integration for cluster coordination and configuration.
SolrCloud is flexible distributed search and indexing, without a master node to allocate nodes, shards and replicas. Instead, Solr uses ZooKeeper to manage these locations, depending on configuration files and schemas. Queries and updates can be sent to any server. Solr will use the information in the ZooKeeper database to figure out which servers need to handle the request.
bin/solr start -e cloud
(run the previous command on solr home,to get the next questions, just accept defaults by press enter)
How many Solr nodes would you like to run in your local cluster (specify 1-4 nodes) [2]:?
Please enter the port for node1 [8983]:
Please enter the port for node2 [7574]:
Create a new collection, Please provide a name for your new collection [gettingstarted]:
How many shards would you like to split new collection into? [2]
How many replicas per shard would you like to create? [2]
Notice that
Two instances of Solr have started on two nodes, one on port 7574 and one on port 8983.
There is one collection created, a two shard collection, each with two replicas.
Solr Admin UI URL: http://localhost:8983/solr
Solr has two main configuration files: the schema file (named either managed-schema or schema.xml), and solrconfig.xml.
solrconfig.xml:
configure the
<slowQueryThresholdMillis> element in the query section <slowQueryThresholdMillis>1000</slowQueryThresholdMillis>
Any queries that take longer than the specified threshold will be logged as "slow" queries at the WARN level.
delete Solr Record