Newer Django needs Python version > 3.4
to setup your machine to run django
1) set latest python 3.xx with Pip support
2) Install Pipenv (for more information about pipenv check https://realpython.com/pipenv-guide/)
$ mkdir project1
$ cd project1
$ pipenv --three install Django


6) run django project using
Steps Summary
Create project2 with name p2 contains one App module name main
mkdir project2
cd project2
pipenv --three install Django
pipenv shell
django-admin startproject p2 .
./manage.py migrate
./manage.py startapp main


6) Update INSTALL_APPS found on settings.py, Add NewApp we just create with name "main" to the list
7) update views.py file to define start page

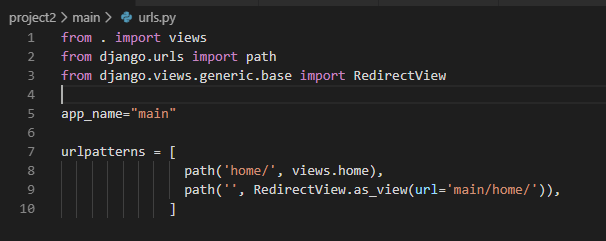
8) create main\urls.py file inside new app directory
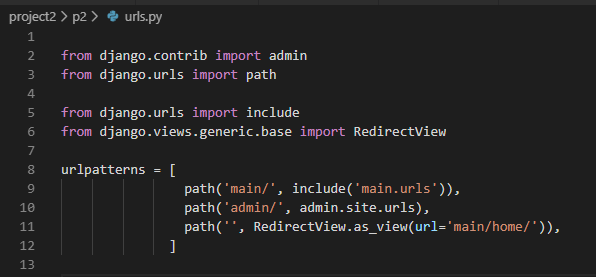
9) update original urls.py to include new app routes file (urls.py)
10) update main\models.py to define Database structure,

11) run the next commands to create DB tables
./manage.py makemigrations main
./manage.py migrate
How to Handle Static Files in Django using settings.py?
STATIC_ROOT/STATIC_URL handle system static files
during development all static folders inside any App we create will be accessible using static URL, but in run time we will write command ./manage.py collectstatic to copy all static files from all app folders and put them to STATIC_ROOT folder
_ROOT: means where these files are located on HD
_URL: means how you can call these files in the URL
add the next 2 line to settings.py
How to Handle Files uploaded at run time using settings.py?
MEDIA_ROOT/MEDIA_URL, handle files uploaded on runtime by users
_ROOT: means where these files are located on HD
_URL: means how you can call these files in the URL
MEDIA_URL = '/FileUpload/'
MEDIA_ROOT = os.path.join(BASE_DIR ,'static', 'FileUpload/')
What is MIDDLEWARE found on settings.py?
MIDDLEWARE = [
'django.middleware.security.SecurityMiddleware',
'django.contrib.sessions.middleware.SessionMiddleware',
'django.middleware.common.CommonMiddleware',
'django.middleware.csrf.CsrfViewMiddleware',
'django.contrib.auth.middleware.AuthenticationMiddleware',
'django.contrib.messages.middleware.MessageMiddleware',
'django.middleware.clickjacking.XFrameOptionsMiddleware',
]
for example allow template to access MEDIA_URL
'context_processors': [
'django.template.context_processors.debug',
'django.template.context_processors.request',
'django.contrib.auth.context_processors.auth',
'django.contrib.messages.context_processors.messages',
'django.template.context_processors.media', #to use {{ MEDIA_URL }} in templates
],
2) For mysql,you need to
a) install mysql drivers
b) run pipenv install mysqlclient
c) update setting.py
View Can be method or Class
urls.py
path('Messages1/', view.MyFormView.as_view(), name='MyFormView'),
path('Messages2/', view. myview, name='myview'),
View.py
def myview(request):
if request.method == "POST":
form = form_class(request.POST)
if form.is_valid():
return HttpResponseRedirect('/success/')
else:
form = MyForm(initial={'key': 'value'})
return render(request, 'form_template.html', {'form': form})
class MyFormView(View):
template_name = 'form_template.html'
def get(self, request):
return render(request, self.template_name, {'form': form})
def post(self, request):
form = form_class(request.POST)
if form.is_valid():
return HttpResponseRedirect('/success/')
return render(request, self.template_name, {'form': form})
Create a Login Screen

Create File Upload

Sample Complete Code
Model
Form
View
Template
HomeForm.html
newuser.html
to setup your machine to run django
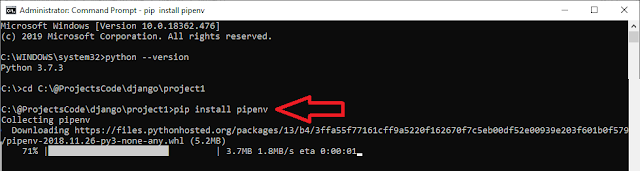
1) set latest python 3.xx with Pip support
2) Install Pipenv (for more information about pipenv check https://realpython.com/pipenv-guide/)
pip install pipenv

Pipenv basic install command takes the form:3) Install latest django framework on current directory only
$ pipenv install [package names]
The user can provide these additional parameters:
--two— Performs the installation in a virtualenv using the systempython2link.
--three— Performs the installation in a virtualenv using the systempython3link.
--python— Performs the installation in a virtualenv using the provided Python interpreter.
$ mkdir project1
$ cd project1
$ pipenv --three install Django

4) Activate virtual env
pipenv shell

5) Create new project with name "booktime " on the current folder
django-admin startproject p1 .

At this point we should have an initial folder structure (in the current
folder) that looks like this:


-
manage.py: The command-line utility that allows you to
interact with the Django project. You will use this very
frequently throughout the book.
-
p1: A Folder that contains the files
every Django project needs, which are
-
./__init__.py: This is an empty file that is
only needed to make the other files importable.
-
./settings.py: This file contains all the
configuration of our project, and can be customized
at will.
-
./urls.py: This file contains all the URL
mappings to Python functions. Any URL that needs
to be handled by the project must have an entry
here.
-
./wsgi.py: This is the entry point that will
be used when deploying our site to production.
-
./__init__.py: This is an empty file that is
only needed to make the other files importable.
-
Pipfile: The list of Python libraries the project is using.
At this point it is only Django.
-
Pipfile.lock: The internal Pipenv file.


-
$ ./manage.py runserver
7) to configure django default Database tables
8) django by default creates admin site /admin , and you can set admin password using
$ ./manage.py migrate
8) django by default creates admin site /admin , and you can set admin password using
$ ./manage.py createsuperuser
9) Django Projects vs. Apps:
we just create an empty project, but this project will contains many modules each module call App, and to create a new app with name "main" inside the project run command
we just create an empty project, but this project will contains many modules each module call App, and to create a new app with name "main" inside the project run command
$ ./manage.py startapp main
this will create a new folder with name main contains these items
main/:
__init__.py
admin.py
apps.py
models.py
views.py
tests.py
migrations
Steps Summary
Create project2 with name p2 contains one App module name main
mkdir project2
cd project2
pipenv --three install Django
pipenv shell
django-admin startproject p2 .
./manage.py migrate
./manage.py startapp main

Start work with new modules (main in our case)
To start work with new module, you should create ( inside module folder)
1) templates directory : this folder will contains all HTML files
2) templates\main : create 'main' directory inside templates folder (main is the NewApp we just created)
3) static directory: this folder will contains JS and Images and any other static contents
4) create HTML start page "\main\templates\home.html"
5) add {% load static %} on the beginning of HTML page and call static resources located in static directory like this {% static 'images/logo.png' %}

6) Update INSTALL_APPS found on settings.py, Add NewApp we just create with name "main" to the list
INSTALLED_APPS = [
'django.contrib.admin',
'django.contrib.auth',
'django.contrib.contenttypes',
'django.contrib.sessions',
'django.contrib.messages',
'django.contrib.staticfiles',
'main.apps.MainConfig',
]
Notes: if the NewApp name = "draw", the name in INSTALL_APPS will be 'draw.apps.DrawConfig'

8) create main\urls.py file inside new app directory


10) update main\models.py to define Database structure,

11) run the next commands to create DB tables
./manage.py makemigrations main
./manage.py migrate
How to Handle Static Files in Django using settings.py?
STATIC_ROOT/STATIC_URL handle system static files
during development all static folders inside any App we create will be accessible using static URL, but in run time we will write command ./manage.py collectstatic to copy all static files from all app folders and put them to STATIC_ROOT folder
_ROOT: means where these files are located on HD
_URL: means how you can call these files in the URL
add the next 2 line to settings.py
STATIC_URL = '/static/'
STATIC_ROOT = os.path.join(BASE_DIR, 'static/')
STATIC_ROOT = os.path.join(BASE_DIR, 'static/')
How to Handle Files uploaded at run time using settings.py?
MEDIA_ROOT/MEDIA_URL, handle files uploaded on runtime by users
_ROOT: means where these files are located on HD
_URL: means how you can call these files in the URL
MEDIA_URL = '/FileUpload/'
MEDIA_ROOT = os.path.join(BASE_DIR ,'static', 'FileUpload/')
What is MIDDLEWARE found on settings.py?
help to inject code that will be executed at specific points of the HTTP request/response cycle.
by default we have the next middlewareMIDDLEWARE = [
'django.middleware.security.SecurityMiddleware',
'django.contrib.sessions.middleware.SessionMiddleware',
'django.middleware.common.CommonMiddleware',
'django.middleware.csrf.CsrfViewMiddleware',
'django.contrib.auth.middleware.AuthenticationMiddleware',
'django.contrib.messages.middleware.MessageMiddleware',
'django.middleware.clickjacking.XFrameOptionsMiddleware',
]
What is context_processors inside TEMPLATES in settings.py?
Context processors are a way to inject additional variables in the scope of templates. By doing so, you would not have to do it in every view that requires these variables.
for example allow template to access MEDIA_URL
'django.template.context_processors.debug',
'django.template.context_processors.request',
'django.contrib.auth.context_processors.auth',
'django.contrib.messages.context_processors.messages',
'django.template.context_processors.media', #to use {{ MEDIA_URL }} in templates
],
Configure Django default DB using settings.py?
1) For postgresql,you need to
a) install the PostgreSQL drivers
b) run pipenv install psycopg2
c) update setting.py
1) For postgresql,you need to
a) install the PostgreSQL drivers
b) run pipenv install psycopg2
c) update setting.py
DATABASES = {
    'default': {
        'NAME': 'app_data',
        'ENGINE': 'django.db.backends.postgresql',
        'USER': 'postgres_user',
        'PASSWORD': 'xxxx'
        }
     }
2) For mysql,you need to
a) install mysql drivers
b) run pipenv install mysqlclient
c) update setting.py
DATABASES = {
    'default': {
        'NAME': 'user_data',
        'ENGINE': 'django.db.backends.mysql',
        'USER': 'mysql_user',
        'PASSWORD': 'xxxx',
        'HOST': '127.0.0.1',
        'PORT': '3306',
        'charset':'utf8',
        'use_unicode':'True'
        }
     }
View Can be method or Class
urls.py
path('Messages1/', view.MyFormView.as_view(), name='MyFormView'),
path('Messages2/', view. myview, name='myview'),
View.py
def myview(request):
if request.method == "POST":
form = form_class(request.POST)
if form.is_valid():
return HttpResponseRedirect('/success/')
else:
form = MyForm(initial={'key': 'value'})
return render(request, 'form_template.html', {'form': form})
class MyFormView(View):
template_name = 'form_template.html'
def get(self, request):
return render(request, self.template_name, {'form': form})
def post(self, request):
form = form_class(request.POST)
if form.is_valid():
return HttpResponseRedirect('/success/')
return render(request, self.template_name, {'form': form})
Create a Login Screen
Create File Upload
Sample Complete Code
Model
class User(models.Model):
username = models.CharField(max_length=100, blank=True)
email = models.CharField(max_length=100, blank=True)
password = models.CharField(max_length=100, blank=True)
class Profile(models.Model):
user = models.OneToOneField(User, on_delete=models.CASCADE)
company = models.CharField(max_length=30, blank=True)
company_site = models.URLField(blank=True)
profile_pic = models.ImageField(upload_to='profile_pics',blank=True)
Form
class ProfileForm(forms.ModelForm):
class Meta:
model = Profile
fields = ['company', 'company_site', 'profile_pic']
class RegisterForm(forms.ModelForm):
username = forms.CharField(max_length=100,label='User Name',
widget=forms.TextInput(
attrs={
"class":"form-control",
"placeholder":"Your Username"
}
)
)
email = forms.EmailField(max_length=100)
password = forms.CharField(widget=forms.PasswordInput)
class Meta:
model = User
fields = ['username', 'email', 'password']
def clean_username(self):
username=self.cleaned_data.get("username")
qs=User.objects.filter(username=username)
if qs.exists():
raise forms.ValidationError("Username is taken")
return username
def clean_email(self):
email=self.cleaned_data.get("email")
qs=User.objects.filter(email=email)
if qs.exists():
raise forms.ValidationError("email is taken")
return email
View
@transaction.atomic
def NewUser(request):
if request.method == 'POST':
user_form = RegisterForm(request.POST or None)
profile_form = ProfileForm(request.POST or None )
if user_form.is_valid() and profile_form.is_valid():
user = user_form.save()
user.set_password(user.password)
user.save()
profile = profile_form.save(commit=False)
profile.user = user
if 'profile_pic' in request.FILES:
print('found it')
profile.profile_pic = request.FILES['profile_pic']
profile.save()
messages.success(request, 'Your profile was successfully updated!')
return redirect('z3950:newuser')
else:
messages.error(request, 'Please correct the error below.')
else:
user_form = RegisterForm() #instance=request.user
profile_form = ProfileForm() #instance=request.user.profile
return render(request, 'z3950/newuser.html', {
'user_form': user_form,
'profile_form': profile_form
})
Template
HomeForm.html
<html>
<head>
<title>
{% block title %}
Edit My Profile
{% endblock%}
</title>
</head>
<Body>
{% if messages %}
<div class="alert alert-secondary" role="alert">
{% for message in messages %}
{{ message }}
{% endfor %}
</div>
{% endif %}
{% block Contents %}
{% endblock %}
</body>
</html>
newuser.html
{% extends 'HomeForm.html' %}
{% block title %}
Edit My Profile
{% endblock%}
{% block Contents %}
{% if user_form.errors or profile_form.errors %}
<div class="alert alert-danger" role="alert">
{{user_form.errors}}
{{profile_form.errors}}
</div>
{% endif %}
<div class="row">
<div class="col-lg-12">
<div class="card">
<div class="card-header d-flex align-items-center">
<h4>Edit My User Info.</h4>
</div>
<div class="card-body">
<form class="form-horizontal" method="POST" action="" enctype="multipart/form-data">
{% csrf_token%}
{%for field in user_form %}
<div class="form-group row">
<label class="col-sm-2 form-control-label">{{field.label_tag}}</label>
<div class="col-sm-10">
<div class="input-group">
{{field}}
<div class="invalid-feedback">{{field.errors}}</div>
</div>
</div>
</div>
{%endfor%}
{%for field in profile_form %}
<div class="form-group row">
<label class="col-sm-2 form-control-label">{{field.label_tag}}</label>
<div class="col-sm-10">
<div class="input-group">
{{field}}
<div class="invalid-feedback">{{field.errors}}</div>
</div>
</div>
</div>
{%endfor%}
<div class="form-group row">
<div class="col-sm-4 offset-sm-2">
<button type="submit" class="btn btn-primary">Submit</button>
<button type="reset" class="btn btn-secondary">Reset</button>
</div>
</div>
</form>
</div>
</div>
</div>
</div>
{% endblock %}