Kubernetes is an open-source system for automating deployment, scaling, and management of containerized applications.
Kubernetes was started by Google and, with its v1.0 release in July 2015, Google donated it to the Cloud Native Computing Foundation (CNCF).

The Master Node is responsible for managing theKubernetes cluster, and it is the entry point for all administrative tasks. We can communicate to the Master Node via the CLI, the GUI (Dashboard), or via APIs.
A Master Node has the following components:


Kubernetes was started by Google and, with its v1.0 release in July 2015, Google donated it to the Cloud Native Computing Foundation (CNCF).
Container Orchestration
Container Orchestrators are the tools which group hosts together to form a cluster, and help us fulfill the next requirements
- Are fault-tolerant
- Can scale, and do this on-demand
- Use resources optimally
- Can discover other applications automatically, and communicate with each other
- Are accessible from the external world
- Can update/rollback without any downtime.
Nowadays, there are many Container Orchestrators available, such as:
-
Docker Swarm
Docker Swarm is a Container Orchestrator provided by Docker, Inc . It is part of Docker Engine . -
Kubernetes
Kubernetes was started by Google, but now, it is a part of the Cloud Native Computing Foundation project. -
Mesos Marathon
Marathon is one of the frameworks to run containers at scale on Apache Mesos . -
Amazon ECS
Amazon EC2 Container Service (ECS) is a hosted service provided by AWS to run Docker containers at scale on its infrastructrue. -
Hashicorp Nomad
Nomad is the Container Orchestrator provided by HashiCorp .
Where to Deploy ContainerOrchestrators?
it can be deployed on the environment of our choice, be it VMs, bare-metal, or public/private/hybrid/multi-cloud setups.
For example, Kubernetes can be deployed inside a company's datacenter, on AWS, on OpenStack, etc.
There are even one-click installers available to setup Kubernetes on the Cloud, like Google Container Engine on Google Cloud, or Azure Container Service on Microsoft Azure.
Kubernetes can be installed on on-premise Bare Metal, on topofdifferent Operating Systems, like RHEL, CoreOS, CentOS, Fedora, Ubuntu, etc.

The Master Node is responsible for managing theKubernetes cluster, and it is the entry point for all administrative tasks. We can communicate to the Master Node via the CLI, the GUI (Dashboard), or via APIs.
For fault tolerance purposes, there can be more than one Master Node in the cluster. If we have more than one Master Node, they would be in a HA (High Availability) mode, and only one of them will be the leader, performing all the operations. The rest of the Master Nodes would be followers.
To manage the cluster state, Kubernetes uses
etcd
, and all Master Nodes connect to it.
etcd
is a distributed key-value store, which we will discuss in a little bit. The key-value store can be part of the Master Node. It can also be configured externally, in which case, the Master Nodes would connect to it.
A Master Node has the following components:
-
API Server
All the administrative tasks are performed via the API Server within the Master Node. A user/operator sends REST commands to the API Server, which then validates and processes the requests. After executing the requests, the resulting state of the cluster is stored in the distributed key-value store. -
Scheduler
As the name suggests, the Scheduler schedules the work to different Worker Nodes. The Scheduler has the resource usage information for each Worker Node. It also knows about the constraints that users/operators may have set, such as scheduling work on a node that has the label disk==ssd set. Before scheduling the work, the Scheduler also takes into account the quality of the service requirements, data locality, affinity, anti-affinity, etc. The Scheduler schedules the work in terms of Pods and Services. -
Controller Manager
The Controller Manager manages different non-terminating control loops, which regulate the state of the Kubernetes cluster. Each one of these control loops knows about the desired state of the objects it manages, and watches their current state through the API Server. In a control loop, if the current state of the objects it manages does not meet the desired state, then the control loop takes corrective steps to make sure that the current state is the same as the desired state. -
etcd
As discussed earlier, etcd is a distributed key-value store which is used to store the cluster state. It can be part of the Kubernetes Master, or, it can be configured externally, in which case, Master Nodes would connect to it.
Worker Node is a machine (VM, physical server, etc.) which runs the applications using Pods and is controlled by the Master Node. Pods are scheduled on the Worker Nodes, which have the necessary tools to run and connect them. A Pod is the scheduling unit in Kubernetes. It is a logical collection of one or more containers which are always scheduled together.
WorkerNodeComponents
-
Container Runtime
To run containers, we need a Container Runtime on the Worker Node. By default, Kubernetes is configured to run containers with Docker . It can also run containers using the rkt Container Runtime. -
kubelet
The kubelet is an agent which runs on eachWorker Node and communicates with the Master Node. It receives the Pod definition via various means (primarily, through the API Server), and runs the containers associated with the Pod. It also makes sure the containers which are part of the Pods are healthy at all times.
The kubelet connects with the Container Runtimes to run containers. Currently, the kubelet and Container Runtimes are tightly coupled. There is work in progress for the Container Runtime Interface (CRI) to have a pluggable CRI in the near future.

-
kube-proxy
Instead of connecting directly to Pods to access the applications, we use a logical construct called a Service as a connection endpoint. A Service groups related Pods, which it load balances when accessed. We will talk more about Services in later chapters.
kube-proxy is the network proxy which runs on each Worker Node and listens to the API Server for each Service endpoint creation/deletion. For each Service endpoint, kube-proxy sets up the routes so that it can reach to it.
State Management with etcd
Kubernetes uses
etcd
to store the cluster state.
etcd
is a distributed key-value store based on the
Raft Consensus Algorithm
. Raft allows a collection of machines to work as a coherent group that can survive the failures of some of its members. At any given time, one of the nodes in the group will be the Master, and the rest of them will be the Followers. Any node can be treated as a Master.

etcd
is written in the Go programming language. In Kubernetes, besides storing the cluster state,
etcd
is also used to store configuration details such as subnets, ConfigMaps, Secrets, etc.
To have a fully functional Kubernetes cluster, we need to make sure of the following:
- A unique IP is assigned to each Pod
- Containers in a Pod can communicate to each other
- The Pod is able to communicate with other Pods in the cluster
- If configured, the application deployed inside a Pod is accessible from the external world.
In Kubernetes, each Pod gets a unique IP address. For container networking, there are two primary specifications:
- Container Network Model (CNM), proposed by Docker
- Container Network Interface (CNI), proposed by CoreOS.
Kubernetes uses CNI to assign the IP address to each Pod.

The Container Runtime offloads the IP assignment to CNI, which connects to the underlying configured plugin, like Bridge or MACvlan, to get the IP address. Once the IP address is given by the respective plugin, CNI forwards it back to the requested Container Runtime.
Container-to-Container Communication Inside a Pod
With the help of the underlying Host OS,all of the Container Runtimes generally create an isolated network entity for each container that it starts. On Linux, that entity is referred toas a Network Namespace. These Network Namespaces can be shared across containers, or with the Host Operating System.
Inside a Pod, containers share the Network Namespaces, so that they can reach to each other via localhost.
Pod-to-Pod Communication A cross Nodes
In a clustered environment, the Pods can be scheduled on any node. We need to make sure that the Pods can communicate across the nodes, and all the nodes should be able to reach any Pod. Kubernetes also puts a condition that there shouldn't be any Network Address Translation (NAT) while doing the Pod-to-Pod communication across Hosts. We can achieve this via:
Communication Between the External World and Pods
By exposing our services to the external world with
kube-proxy
, we can access our applications from outside the cluster.
Kubernetes Configuration
Kubernetes can be installed using different configurations. The four major installation types are briefly presented below:
-
All-in-One Single-Node Installation
With All-in-One, all the Master and Worker components are installed on a single node. This is very useful for learning, development, and testing. This type should not be used in production. Minikube is one such example, and we are going to explore it in future chapters. -
Single-Node etcd, Single-Master, and Multi-Worker Installation
In this setup, we will have a single Master Node, which will also run a single-node etcd instance. Multiple Worker Nodes are connected to the Master Node. -
Single-Node etcd, Multi-Master, and Multi-Worker Installation
In this setup, we will have multiple Master Nodes, which will work in HA mode, but we will have a single-node etcd instance. Multiple Worker Nodes are connected to the Master Nodes. -
Multi-Node etcd, Multi-Master, and Multi-Worker Installation
In this mode, etcd is configured in a clustered mode, outside the Kubernetes cluster, and the Nodes connect to it. The Master Nodes are all configured in an HA mode, connecting to multiple Worker Nodes. This is the most advanced and recommended production setup.
Cloud Ready for Kubernetes
Some vendors providing Hosted Solutions for Kubernetes, like:
Kubernetes InstallationTools/Resources
-
kubeadm
kubeadm is a first-class citizen on the Kubernetes ecosystem. It is a secure and recommended way to bootstrap the Kubernetes cluster. It has a set of building blocks to setup the cluster, but it is easily extendable to add more functionality. Please note that kubeadm does not support the provisioning of machines. -
Kubespray
With Kubespray (formerly known as Kargo), we can install Highly Available Kubernetes clusters on AWS, GCE, Azure, OpenStack, or Bare Metal. Kubespray is based onAnsible, and is available on most Linux distributions. It is a Kubernetes Incubator project. -
Kops
With Kops , we can create, destroy, upgrade, and maintain production-grade, highly-available Kubernetes clusters from the command line. It can provision the machines as well. Currently, AWS is officially supported. Support for GCE and VMware vSphere are in alpha stage, and other platforms are planned for the future.
If the existing solutions and tools do not fit your requirements, then
you can always install Kubernetes from scratch
.
Localhost Installation
There are a few localhost installation options available to deploy single- or multi-node Kubernetes clusters on our workstation/laptop:
Minikube is the preferred and recommended way to create an all-in-one Kubernetes setup.
Installing Minikube on Linux
how to install minikube on Linux (Ubuntu 16.04):
-
Install the hypervisor (VirtualBox), if you haven't done so already
$ sudo apt-get install virtualbox -
Install minikube
We can download the latest release from the minikube release page . Once downloaded, we need to make it executable and copy it in the PATH :
- curl -Lo minikube https://storage.googleapis.com/minikube/releases/v1.0.0/minikube-linux-amd64 && chmod +x minikube && sudo cp minikube /usr/local/bin/ && rm minikube
We can start minikube with the minikube start command
Tip: Use 'minikube start -p <name>' to create a new cluster, or 'minikube delete' to delete this one.
Check the status
With the minikube status command, we can see the status of minikube
With the minikube status command, we can see the status of minikube
Stop minikube
With the minikube stop command, we can stop minikube:
With the minikube stop command, we can stop minikube:
Note: if you get error when start minikube, just delete it and start it again using
$minikube delete && minikube start
$minikube delete && minikube start
Installing Minikube on macOS
- Install VirtualBox on macOS.
-
Install minikube
$ brew cask install minikube
or We can download the latest release from the minikube release page . Once downloaded, we need to make it executable and copy it in the PATH .
$ curl -Lo minikube https://storage.googleapis.com/minikube/releases/v0.20.0/minikube-darwin-amd64 && chmod +x minikube && sudo mv minikube /usr/local/bin/ -
Start minikube:
$
minikube start
- Check the status: $ minikube status
- Stop minikube: $ minikube stop
Installing Minikube onWindows
install minikube on Windows 10:
- Install VirtualBox
- Go to the minikube release page
- Download the minikube binary from the Distribution section
- Add the downloaded minikube binary to your PATH
- Download kubectl and add it to your PATH
- Start minikube: $ minikube start --vm-driver=virtualbox
- Check the status : $ minikube status
- Stop minikube: $ minikube stop
Kubernetes cluster access methods
1) use kubectl to access Minikube via CLI
2) Kubernetes dashboard to access it via GUI
3) curl command, with the right credentials to access it via APIs.
Install kubectl
1) Install kubectl on Linux:
-
Download the latest stable
kubectl
binary
$ curl -LO https://storage.googleapis.com/kubernetes-release/release/$(curl -s https://storage.googleapis.com/kubernetes-release/release/stable.txt)/bin/linux/amd64/kubectl -
Make the
kubectl
binary executable
$ chmod +x ./kubectl -
Move the
kubectl
binary to the
PATH
$ sudo mv ./kubectl /usr/local/bin/kubectl
2) Install kubectl on macOS
$ brew install kubectl
3) Install kubectl on Windows
- Get the latest
kubectl
release from
here
Depending on the latest release, download the kubectl binary. In the example below, we are downloading the v1.6.3 release - $ curl -LO https://storage.googleapis.com/kubernetes-release/release/v1.6.3/bin/windows/amd64/kubectl.exe
- Once downloaded, move the kubectl binary to the PATH .
Connect to the Kubernetes cluster
To connect to the Kubernetes cluster, kubectl needs the Master Node endpoint and the credentials to connect to it.$kubectl config view
Get information about the minikube cluster
$ kubectl cluster-info
Kubernetes Dashboard
provides the user interface for the Kubernetes cluster. To access the Dashboard of Minikube, we can use minikube dashboard , which would open a new tab on our web browser, displaying the Kubernetes dashboard:$ minikube dashboard
kubectl proxy
kubectl would authenticate with the API Server on the Master Node and would make the dashboard available on http://localhost:8001/ui .
$ kubectl proxy
Starting to serve on 127.0.0.1:8001
Kubernetes Building Blocks
1) Pods
A
Pod
is the smallest and simplest Kubernetes object. It is the unit of deployment in Kubernetes, which represents a single instance of the application. A Pod is a logical collection of one or more containers, which:
- Are scheduled together on the same host
- Share the same network namespace
-
Mount the same external storage (Volumes).


2) Labels
Labels
are key-value pairs that can be attached to any Kubernetes objects (e.g. Pods). Labels are used to organize and select a subset of objects, based on the requirements in place. Many objects can have the same label(s). Labels do not provide uniqueness to objects.

With Label Selectors, we can select a subset of objects. Kubernetes supports two types of Selectors:
-
Equality-Based Selectors
Equality-Based Selectors allow filtering of objects based on label keys and values. With this type of Selectors, we can use the = , == , or != operators. For example, with env==dev we are selecting the objects where the env label is set to dev . -
Set-Based Selectors
Set-Based Selectors allow filtering of objects based on a set of values. With this type of Selectors, we can use the in , notin , and exist operators. For example, with env in (dev,qa) , we are selecting objects where the env label is set to dev or qa .
3) ReplicationControllers
A
ReplicationController
(
rc
) is a controller that is part of the Master Node's Controller Manager. It makes sure the specified number of replicas for a Pod is running at any given point in time. If there are more Pods than the desired count, the ReplicationController would kill the extra Pods, and, if there are less Pods, then the ReplicationController would create more Pods to match the desired count. Generally, we don't deploy a Pod independently, as it would not be able to re-start itself, if something goes wrong. We always use controllers like ReplicationController to create and manage Pods.
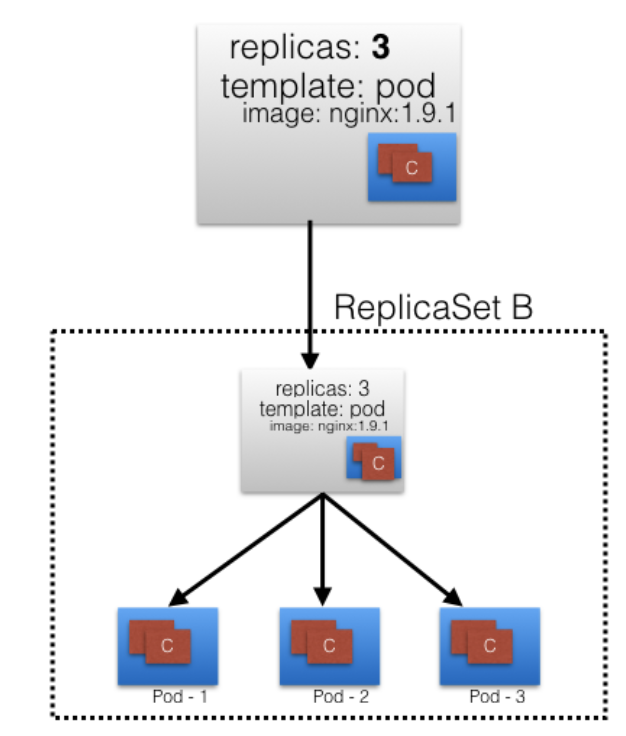
4) ReplicaSets
A
ReplicaSet
(rs) is the next-generation ReplicationController. ReplicaSets support both equality- and set-based Selectors, whereas ReplicationControllers only support equality-based Selectors. Currently, this is the only difference.
Next, you can see a graphical representation of a ReplicaSet, where we have set the replica count to 3 for a Pod.

ReplicaSets can be used independently, but they are mostly used by Deployments to orchestrate the Pod creation, deletion, and updates. ADeploymentautomatically creates the ReplicaSets, and we do not have to worry about managing them.
Deployments
Deployment
objects provide declarative updates to Pods and ReplicaSets. The DeploymentController is part of the Master Node's Controller Manager, and it makes sure that the current state always matches the desired state.
In the following example, we have a
Deployment
which creates a
ReplicaSet
A
.
ReplicaSet A
then creates
3 Pods
. In each Pod, one of the containers uses the
nginx:1.7.9
image.

Now, in the Deployment, we change the Pod's template and we update the image for the
nginx
container from
nginx:1.7.9
to
nginx:1.9.1
. As have modified the Pod's template, a new
ReplicaSet B
gets created. This process is referred to as a
Deployment rollout
.
A rollout is only triggered when we update the Pod's template for a deployment. Operations like scaling the deployment do not trigger the deployment.

Once
ReplicaSet B
is ready, the Deployment starts pointing to it.
On top of ReplicaSets, Deployments provide features like Deployment recording, with which, if something goes wrong, we can rollback to a previously known state.
Namespaces
If we have numerous users whom we would like to organize into teams/projects, we can partition the Kubernetes cluster into sub-clusters using
Namespaces
. The names of the resources/objects created inside a Namespace are unique, but not across Namespaces.
To list all the Namespaces, we can run the following command:
$ kubectl get namespaces
NAME STATUS AGE
default Active 11h
kube-public Active 11h
kube-system Active 11h
NAME STATUS AGE
default Active 11h
kube-public Active 11h
kube-system Active 11h
Generally, Kubernetes creates two default namespaces:
k
ube-system
and
default.
The
kube-system
namespace contains the objects created by the Kubernetes system. The
default
namespace contains the objects which belong to any other namespace. By default, we connect to the
default
Namespace.
k
ube-public
is a special namespace, which is readable by all users and used for special purposes, like bootstrapping a cluster.
Using
Resource Quotas
, we can divide the cluster resources within Namespaces. We will briefly cover Resource Quotas in one of the future chapters.
Connecting Users toPods
To access the application, a user/client needs to connect to the Pods. As Pods are ephemeral in nature, resources like IP addresses allocated to it cannot be static. Pods could die abruptly or be rescheduled based on existing requirements.
Let's take, for example, a scenario in which a user/client is connected to a Pod using its IP address.

Unexpectedly, the Pod to which the user/client is connected dies, and a new Pod is created by the controller. The new Pod will have a new IP address, which will not be known automatically to the user/client of the earlier Pod.

To overcome this situation, Kubernetes provides a higher-level abstraction called
Service
, which logically groups Pods and a policy to access them. This grouping is achieved via Labels and Selectors.
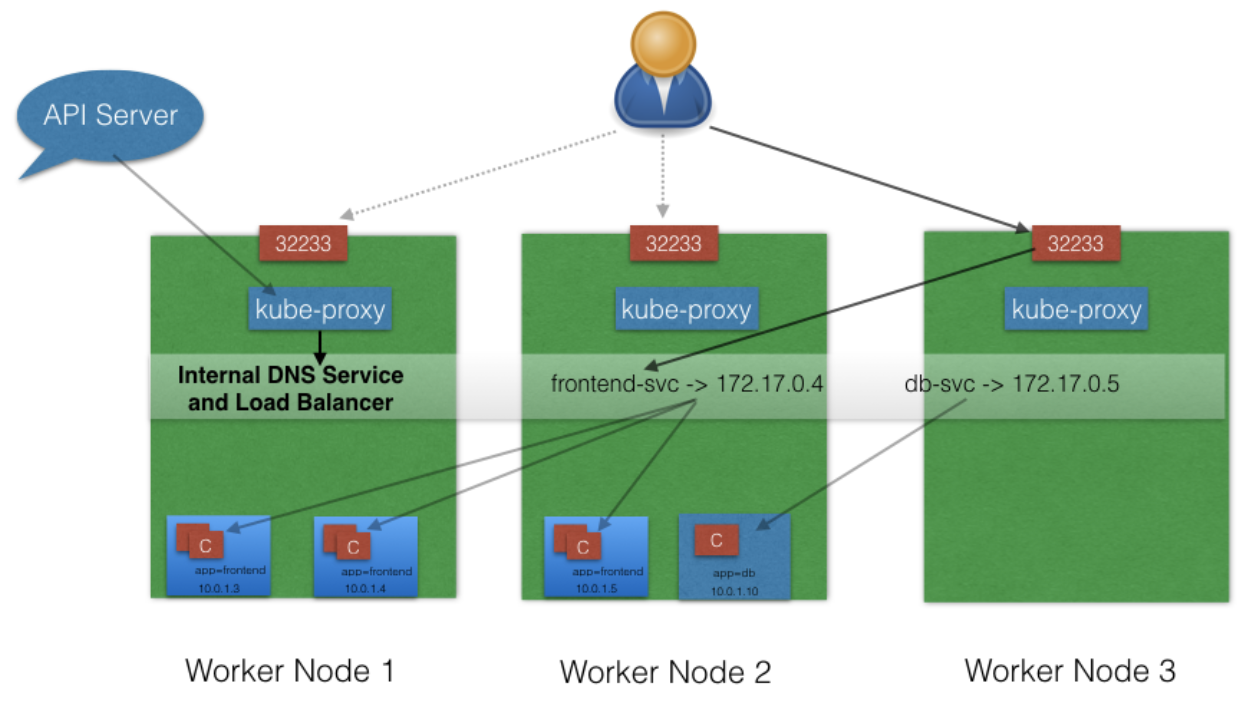
Services
For example, in the following graphical representation we have used the
app
keyword as a Label, and
frontend
and
db
as values for different Pods.

Using Selectors (
app==frontend
and
app==db
), we can group them into two logical groups: one with 3 Pods, and one with just one Pod.
We can assign a name to the logical grouping, referred to as a
service name
. In our example, we have created two Services,
frontend-svc
and
db-svc
, and they have the
app==frontend
and the
app==db
Selectors, respectively.

Service ObjectExample
The following is an example of a Service object:
kind: Service
apiVersion: v1
metadata:
name: frontend-svc
spec:
selector: app: frontend ports: - protocol: TCP port: 80 targetPort: 5000
apiVersion: v1
metadata:
name: frontend-svc
spec:
selector: app: frontend ports: - protocol: TCP port: 80 targetPort: 5000
in which we are creating a
frontend-svc
Service by selecting all the Pods that have the Label
app
set to the
frontend
. By default, each Service also gets an IP address, which is routable only inside the cluster. In our case, we have
172.17.0.4
and
172.17.0.5
IP addresses for our
frontend-svc
and
db-svc
Services, respectively. The IP address attached to each Service is also known as the ClusterIP for that Service.

The user/client now connects to a Service via the IP address, which forwards the traffic to one of the Pods attached to it. A Service does the load balancing while selecting the Pods for forwarding the data/traffic.
While forwarding the traffic from the Service, we can select the target port on the Pod. In our example, for
frontend-svc
, we will receive requests from the user/client on Port 80. We will then forward these requests to one of the attached Pods on Port 5000. If the target port is not defined explicitly, then traffic will be forwarded to Pods on the Port on which the Service receives traffic.
A tuple of Pods, IP addresses, along with the targetPort is referred to as a Service Endpoint. In our case,
frontend-svc
has 3 Endpoints:
10.0.1.3:5000
,
10.0.1.4:5000
, and
10.0.1.5:5000
.
kube-proxy
All of the Worker Nodes run a daemon called
kube-proxy
, which watches the API Server on the Master Node for the addition and removal of Services and endpoints. For each new Service, on each node,
kube-proxy
configures the IPtables rules to capture the traffic for its ClusterIP and forwards it to one of the endpoints. When the Service is removed,
kube-proxy
removes the IPtables rules on all nodes as well.

ServiceDiscovery
As Services are the primary mode of communication in Kubernetes, we need a way to discover them at runtime. Kubernetes supports two methods of discovering a Service:
-
Environment Variables
As soon as the Pod starts on any Worker Node, the kubelet daemon running on that node adds a set of environment variables in the Pod for all active Services. For example, if we have an active Service called redis-master , which exposes port 6379 , and its ClusterIP is 172.17.0.6 , then, on a newly created Pod, we can see the following environment variables:
REDIS_MASTER_SERVICE_HOST=172.17.0.6
REDIS_MASTER_SERVICE_PORT=6379
REDIS_MASTER_PORT=tcp://172.17.0.6:6379
REDIS_MASTER_PORT_6379_TCP=tcp://172.17.0.6:6379
REDIS_MASTER_PORT_6379_TCP_PROTO=tcp
REDIS_MASTER_PORT_6379_TCP_PORT=6379
REDIS_MASTER_PORT_6379_TCP_ADDR=172.17.0.6
With this solution, we need to be careful while ordering our Services, as the Pods will not have the environment variables set for Services which are created after the Pods are created. -
DNS
Kubernetes has an add-on for DNS , which creates a DNS record for each Service and its format is like my-svc.my-namespace.svc.cluster.local. Services within the same namespace can reach to other services with just their name. For example, if we add a Service redis-master in the my-ns Namespace, then all the Pods in the same Namespace can reach to the redis Service just by using its name, redis-master . Pods from other Namespaces can reach the Service by adding the respective Namespace as a suffix, like redis-master.my-ns . -
This is the most common and highly recommended solution. For example, in the previous section's image, we have seen that an internal DNS is configured, which maps our services frontend-svc and db-svc to 172.17.0.4 and 172.17.0.5 ,respectively.
ServiceType
While defining a Service, we can also choose its access scope. We can decide whether the Service:
- Is only accessible within the cluster
- Is accessible from within the cluster and the external world
- Maps to an external entity which resides outside the cluster.
Access scope is decided by
ServiceType
, which can be mentioned when creating the Service.
1) ServiceType - ClusterIP
ClusterIP
is the default
ServiceType
. A Service gets its Virtual IP address using the ClusterIP. That IP address is used for communicating with the Service and is accessible only within the cluster.
With the
NodePort
ServiceType
, in addition to creating a ClusterIP, a port from the range
30000-32767
is mapped to the respective service, from all the Worker Nodes. For example, if the mapped NodePort is
32233
for the service
frontend-svc
, then, if we connect to any Worker Node on port
32233
, the node would redirect all the traffic to the assigned ClusterIP
-172.17.0.4
.
By default, while exposing a NodePort, a random port is automatically selected by the Kubernetes Master from the port range
30000-32767
. If we don't want to assign a dynamic port value for NodePort, then, while creating the Service, we can also give a port number from the earlier specific range.
2) ServiceType - NodePort
3) ServiceType -LoadBalancer
With the
LoadBalancer
ServiceType
:
- NodePort and ClusterIP Services are automatically created, and the external load balancer will route to them
- The Services are exposed at a static port on each Worker Node
- The Service is exposed externally using the underlying Cloud provider's load balancer feature.

The LoadBalancer
ServiceType
will only work if the underlying infrastructure supports the automatic creation of Load Balancers and have the respective support in Kubernetes, as is the case with the Google Cloud Platform and AWS.
4) ServiceType -ExternalIP
A Service can be mapped to an ExternalIP address if it can route to one or more of the Worker Nodes. Traffic that is ingressed into the cluster with the ExternalIP (as destination IP) on the Service port, gets routed to one of the the Service endpoints.

Please note that ExternalIPs are not managed by Kubernetes. The cluster administrators has configured the routing to map the ExternalIP address to one of the nodes.
5) ServiceType -ExternalName
ExternalName
is a special
ServiceType
, that has no Selectors and does not define any endpoints. When accessed within the cluster, it returns a
CNAME
record of an externally configured service.
The primary use case of this
ServiceType
is to make externally configured services like
my-database.example.com
available inside the cluster, using just the name, like
my-database
, to other services inside the same Namespace.
Ingress
Services limitations: With Services, routing rules are attached to a given Service. They exist for as long as the Service exists. If we can somehow decouple the routing rules from the application, we can then update our application without worrying about its external access. This can be done using the Ingress resource.
Ingress advantages: An Ingress is a collection of rules that allow inbound connections to reach the cluster Services.
Ingress advantages: An Ingress is a collection of rules that allow inbound connections to reach the cluster Services.
To allow the inbound connection to reach the cluster Services, Ingress configures a Layer 7 HTTP load balancer for Services and provides the following:
- TLS (Transport Layer Security)
- Name-based virtual hosting
- Path-based routing
- Custom rules.

With Ingress, users don't connect directly to a Service. Users reach the Ingress endpoint, and, from there, the request is forwarded to the respective Service. You can see an example of a sample Ingress definition below:
apiVersion: extensions/v1beta1
kind: Ingress
metadata:
name: web-ingress
spec:
rules:
- host: blue.myweb.com
http:
paths:
- backend:
serviceName: blue-service
servicePort: 80
- host: green.myweb.com
http:
paths:
- backend:
serviceName: green-service
servicePort: 80
kind: Ingress
metadata:
name: web-ingress
spec:
rules:
- host: blue.myweb.com
http:
paths:
- backend:
serviceName: blue-service
servicePort: 80
- host: green.myweb.com
http:
paths:
- backend:
serviceName: green-service
servicePort: 80
According to the example we provided, users requests to both blue.myweb.com and green.myweb.com would go to the same Ingress endpoint, and, from there, they would be forwarded to blue-service, and green-service, respectively. Here, we have seen an example of a Name-Based Virtual Hosting Ingress rule.
We can also have Fan Out Ingress rules, in which we send requests like myweb.com/blue and myweb.com/green, which would be forwarded to blue-service and green-service, respectively.

The Ingress resource does not do any request forwarding by itself. All of the magic is done using the Ingress Controller.
An Ingress Controller is an application which watches the Master Node's API Server for changes in the Ingress resources and updates the Layer 7 load balancer accordingly. Kubernetes has different Ingress Controllers, and, if needed, we can also build our own. GCE L7 Load Balancer and Nginx Ingress Controller are examples of Ingress Controllers.
Start the Ingress Controller with minikube
Minikube v0.14.0 and above ships the Nginx Ingress Controller setup as an add-on. It can be easily enabled by running the following command:
$ minikube addons enable ingress
Deploy an Ingress Resource
Once the Ingress Controller is deployed, we can create an Ingress resource using the kubectl create command. For example, if we create a myweb-ingress.yaml file with the content that we saw on the Ingress II page, then, we will use the following command to create an Ingress resource:
$ kubectl create -f myweb-ingress.yaml
Access Services Using Ingress
With the Ingress resource we just created, we should now be able to access the blue-service or green-service services using blue.myweb.com and green.myweb.com URLs. As our current setup is on minikube, we will need to update the host configuration file (/etc/hosts on Mac and Linux) on our workstation to the minikube's IP for those URLs:
$ cat /etc/hosts
127.0.0.1 localhost
::1 localhost
192.168.99.100 blue.myweb.com green.myweb.com
127.0.0.1 localhost
::1 localhost
192.168.99.100 blue.myweb.com green.myweb.com
Once this is done, we can now open blue.myweb.com and green.myweb.com on the browser and access the application.
For more information check https://www.youtube.com/watch?v=XKbV-vurBzg
Deploy an application using the GUI
$ minikube dashboardRunning this command will open up a browser with the Kubernetes GUI, which we can use to manage containerized applications. By default, the Dashboard is connected to the default Namespace. So, all the operations that we will do now will be performed inside the default Namespace.
Click "Create" , which will open an interface like the one below:

We can either provide the application details here, or we can upload a YAML file with our Deployment details. As shown, we are providing the following application details:
- The application name is webserver
- The Docker image to use is nginx:alpine, where alpine is the image tag
- The replica count, or the number of Pods, is 3
- No Service, as we will be creating it later.
If we click on SHOW ADVANCED OPTIONS, we can specify options such as Labels, Environment Variables, etc. By default, the app Label is set to the application name. In our example, an app:webserver Label is set to different objects created by this Deployment.
By clicking on the DEPLOY button, we can trigger the deployment. As expected, the Deployment webserver will create a ReplicaSet (webserver-1529352408), which will eventually create three Pods (webserver-1529352408-xxxx).
View deployed Applications Using CLI
- List the Deployments
We can list all the Deployments in the given Namespace using the kubectl get deployments command:
$ kubectl get deployments
NAME DESIRED CURRENT UP-TO-DATE AVAILABLE AGE
webserver 3 3 3 3 3m - List the ReplicaSets
We can list all the ReplicaSets in the given Namespace using the kubectl get replicasets command:
$ kubectl get replicasets
NAME DESIRED CURRENT READY AGE
webserver-3101375161 3 3 3 4m - List the Pods
We can list all the Pods in the given Namespace using the kubectl get pods command:
$ kubectl get pods
NAME READY STATUS RESTARTS AGE
webserver-3101375161-jzk57 1/1 Running 0 4m
webserver-3101375161-vxw2g 1/1 Running 0 4m
webserver-31013755161-w1flz 1/1 Running 0 4m
Look at a Pod's details
$ kubectl describe pod webserver-3101375161-jzk57
Select the Pods with a given Label
selecting all the Pods that have the app Label's value set to webserver:
$ kubectl get pods -l app=webserver
Delete the Deployment
$ kubectl delete deployments webserver
Deploying the Application Using the CLI
It is not necessary to create the Deployment first, and the Service after. They can be created in any order. A Service will connect Pods based on the Selector.
Create Deployment:
$ kubectl create -f webserver.yaml
Where webserver.yaml file has the following content:
apiVersion: extensions/v1beta1
kind: Deployment
metadata:
name: webserver
spec:
replicas: 3
template:
metadata:
labels:
app: webserver
spec:
containers:
- name: webserver
image: nginx:alpine
ports:
- containerPort: 80
kind: Deployment
metadata:
name: webserver
spec:
replicas: 3
template:
metadata:
labels:
app: webserver
spec:
containers:
- name: webserver
image: nginx:alpine
ports:
- containerPort: 80
Create Service to Expose pods to External World:
ServiceType : NodePort, which opens up a static port on all the Worker Nodes. If we connect to that port from any node, we are forwarded to the respective Service.$ kubectl create -f webserver-svc.yaml
Where webserver-svc.yaml file contains:
apiVersion: v1
kind: Service
metadata:
name: web-service
labels:
run: web-service
spec:
type: NodePort
ports:
- port: 80
protocol: TCP
selector:
app: webserver
kind: Service
metadata:
name: web-service
labels:
run: web-service
spec:
type: NodePort
ports:
- port: 80
protocol: TCP
selector:
app: webserver
To get more details about the Service, we can use the kubectl describe command, like in the following example:
$ kubectl describe svc web-service
Name: web-service
Namespace: default
Labels: run=web-service
Annotations: <none>
Selector: app=webserver
Type: NodePort
IP: 10.0.0.133
Port: <unset> 80/TCP
NodePort: <unset> 32636/TCP
Endpoints: 172.17.0.4:80,172.17.0.5:80,172.17.0.6:80
Session Affinity: None
Events: <none>
Name: web-service
Namespace: default
Labels: run=web-service
Annotations: <none>
Selector: app=webserver
Type: NodePort
IP: 10.0.0.133
Port: <unset> 80/TCP
NodePort: <unset> 32636/TCP
Endpoints: 172.17.0.4:80,172.17.0.5:80,172.17.0.6:80
Session Affinity: None
Events: <none>
web-service uses app=webserver as a Selector, through which it selected our three Pods, which are listed as endpoints. So, whenever we send a request to our Service, it will be served by one of the Pods listed in the Endpoints section.
So, now if user need to connect to the available service, he will use 32636 port and to get the Kubernetes IP run the next command
$ minikube ip
192.168.99.103

Service Ports:

Target Port: Target port is the port on the POD where the service is running.(targetPort is optional, By default the targetPort will be set to the same value as the port field)
Nodeport: Node port is the port on which the service can be accessed from external users, (allowed ports 30000–32767), Kubernetes NodePort cannot expose standard low-numbered ports like 80 and 443, or even 8080 and 8443.
So, from the previous image, public users can access service using port 33333, and other pods can internally call the service using port 8080 and these calls will redirect to port 8170 where the service is exists and running inside the pod
To delete this service
$ kubectl delete svc web-service
Kubernetes Volume Management
As we know, containers, which create the Pods, are ephemeral in nature. All data stored inside a container is deleted if the container crashes. However, kubelet will restart it with a clean state, which means that it will not have any of the old data.
To overcome this problem, Kubernetes uses Volumes. A Volume is essentially a directory backed by a storage medium. The storage medium and its content are determined by the Volume Type.
In Kubernetes, a Volume is attached to a Pod and shared among the containers of that Pod.

Volume Types
Some of the Volume Types are:
- emptyDir
An empty Volume is created for the Pod as soon as it is scheduled on the Worker Node. The Volume's life is tightly coupled with the Pod. If the Pod dies, the content of emptyDir is deleted forever. - hostPath
With the hostPath Volume Type, we can share a directory from the host to the Pod. If the Pod dies, the content of the Volume is still available on the host. - gcePersistentDisk
With the gcePersistentDisk Volume Type, we can mount a Google Compute Engine (GCE) persistent disk into a Pod. - awsElasticBlockStore
With the awsElasticBlockStore Volume Type, we can mount an AWS EBS Volume into a Pod. - nfs
With nfs, we can mount an NFS share into a Pod. - iscsi
With iscsi, we can mount an iSCSI share into a Pod. - secret
With the secret Volume Type, we can pass sensitive information, such as passwords, to Pods. We will take a look at an example in a later chapter. - persistentVolumeClaim
We can attach a Persistent Volume to a Pod using a persistentVolumeClaim. We will cover this in our next section.
Helm
To deploy an application, we use different Kubernetes manifests, such as Deployments, Services, Volume Claims, Ingress, etc. Sometimes, it can be tiresome to deploy them one by one. We can bundle all those manifests after templatizing them into a well-defined format, along with other metadata. Such a bundle is referred to as Chart. These Charts can then be served via repositories, such as those that we have for rpm and deb packages.
Helm is a package manager (analogous to yum and apt) for Kubernetes, which can install/update/delete those Charts in the Kubernetes cluster.
Helm has two components:
- A client called helm, which runs on your user's workstation
- A server called tiller, which runs inside your Kubernetes cluster.
The client helm connects to the server tiller to manage Charts.
Deploy a multi-Tier application and Scale it
Check this video
https://www.youtube.com/watch?v=0rLAGUPn2iA
| _ | Front End | Back End |
| Deploy yaml | apiVersion: extensions/v1beta1
kind: Deployment
metadata:
name: rsvp
spec:
replicas: 1
template:
metadata:
labels:
app: rsvp
spec:
containers:
- name: rsvp-app
image: teamcloudyuga/rsvpapp
env:
- name: MONGODB_HOST
value: mongodb
ports:
- containerPort: 5000
name: web-port
|
apiVersion: extensions/v1beta1
kind: Deployment
metadata:
  name: rsvp-db
spec:
  replicas: 1
  template:
    metadata:
      labels:
        appdb: rsvpdb
    spec:
      containers:
      - name: rsvpd-db
        image: mongo:3.3
        env:
        - name: MONGODB_DATABASE
          value: rsvpdata
        ports:
        - containerPort: 27017
|
| Service yaml | apiVersion: v1
kind: Service
metadata:
name: rsvp
labels:
apps: rsvp
spec:
type: NodePort
ports:
- port: 80
nodeport : 33333
protocol: TCP
selector:
app: rsvp
|
apiVersion: v1
kind: Service
metadata:
  name: mongodb
  labels:
    app: rsvpdb
spec:
  ports:
  - port: 27017
    protocol: TCP
  selector:
    appdb: rsvpdb
|
Note:
In backend, we did not specify any ServiceType, So, mongodb Service will not be accessible from the external world.